Showing posts with label Unicycle. Show all posts

Sunday, September 22, 2013

Unicycle Cupcakes


It's birthday time again for my husband and while we are not traveling to a Muni race weekend, I still had unicycles on the mind. 

I wondered about making home made sprinkles.  There are such recipes, but many of them are called confetti and can be cut in shapes. That is what I was looking for. Then one post I read just used fondant and cut out small shapes. Even better.

I did need a tiny unicycle cutter.  I took out my cutter making kit I had used before and found I was out of metal. A couple sites had instructions for making cookie cutters out of a soda can. Because my cutter would be small, this seemed like a perfect plan. I cut up a can and folded the metal onto itself and created a tiny unicycle.

Marshmallow fondant I had made before and felt confident making again. I made up a half a recipe, but easily could have made a quarter. I colored it purple and rolled it out. The mini cutter worked perfectly.  I laid the unicycles out on a cookie sheet and using a butter knife, made spoke impressions. 
For the cupcakes, I figured I would make a healthier version of the box mix again.  Instead of just Greek yogurt, I had added a bit of water.  But I also read about using coffee with chocolate cake to bring out the chocolate flavor.  Some people mention that the cake is a bit flat when using yogurt, so I added an egg white too. My recipe ended up being 1 egg white, 1 full cup of plain Greek yogurt (6 oz container plus a little), almost a cup of cooled coffee, and Betty Crocker Super Moist Fudge cake mix. It yielded 20 cupcakes.  They are just right in flavor and texture. I baked them in papers for 18 minutes.
Then it was on to the buttercream frosting. I made up a recipe using two sticks of butter, 3 cups of powdered sugar, 1 TB of vanilla and 2 TB of milk. It was enough to thickly frost 17 cupcakes using a decorator bag with no tip.
Finally I added the unicycles and some confetti sprinkles. 


Wednesday, July 10, 2013

Unicycling Unicorn

There is a Kiddie Parade in my town every year to kick off the Fireman's Carnival. I didn't know much about the parade until someone encouraged us to check it out a few years ago.

This year we decided to do it again. Kids dress up, there are strollers, wagons, a few bikes and trikes.  My nine year old daughter rides a unicycle and the three year old can ride a tricycle and bike with training wheels. 

We considered different costume options. First we were going to go with Mickey and Minnie Mouse. We have a Minnie dress. Then I saw a unicycling unicorn and thought a unicorn would be a great idea for my unicycling daughter. We tried to convince the three year old to have a triceratops costume or maybe a pony. At the end, she wanted to be like her sister. 

After surveying our potential supplies, we went with white felt, white micro fleece and organdy ribbon. 

We started with the horn and our helmets. After trying out some thin cardboard, white card stock worked best. Next I used clear packing tape and a hot glue gun to secure white microfleece and ribbon.  For the ears I used white felt and pipe cleaners.  Clear packing tape made it easy to attach everything to the helmets and would later be removable.  I also made a mane, tail, wrist and ankle cuffs out of the microfleece with hot glue.  I would normally sew things, but using the hot glue was quick and easy.

The girls didn't win the competition, but did get an honorable mention and won six dollars.

Sunday, November 4, 2012

The Start of Something Fun

Probably two years ago I found some fabric with bicycles and unicycles on it by Michael Miller. I thought it might be nice for a birthday shirt for my unicycle riding daughter. She was not interested, but I knew with now three unicyclists in the house I would use it someday.

Almost a year ago I had seen this hoop-like fabric and used some for a tablecloth at a hoop demo.

As the weather gets colder and we spend more time cuddling under blankets, I naturally thought about a quilt.

Googling quilt images is one thing I do from time to time. I get some neat ideas from what others are doing. Many "modern quilts" are making use of negative space.

Using the cycling fabric along with the hooping fabric seemed to be the perfect fabrics to try out some new quilting.

As I was seeking out coordinating fabrics, I remembered how unique the cycling fabric is. The only shade that finally seemed to match was in the fat quarter section. The hoop fabric is predominately pink, which isn't my favorite, but I decided I could bring out the orange and it would work. Both fabrics have white, so that was an easy choice. I didn't want the quilt to have too much white though and sought out a green. The green represents the outdoors for me and how my family enjoys being outdoors.

At first I wasn't sure how all the fabrics might go together. Then I decided to just keep each print separate and use the white to tie everything together.

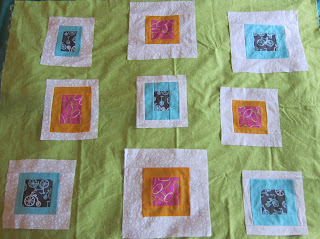
This is another quilt as I go project which I have come to enjoy. I started fussy cutting the cycling fabric. I wanted to make sure I got at least a couple unicycles. Then I cut strips of the aqua and the white in varying widths. Each block went together quickly and I really liked the effect.

The hoop fabric came next. I found patterns within the fabric to cut around. And once again cut varying strips to border each square and rectangle.

After working on the blocks some of yesterday and today, I figured I had enough to lay them out. Laying the blocks on top of the green gave me a better idea of how it will look. I think I could even make some more blocks for a bigger quilt.
unicycle and hoop quilt
It will be interesting figuring out the in between measurements and deciding on final placements.

One thing I'd like to try soon is quilting on a long arm sewing machine. There is one shop in the area where one can rent time on the machine. Eventually I want to make a queen sized quilt for my bed and use the long arm machine for that. Working on something smaller first would be good practice.

Thursday, September 20, 2012

Unicycle Cookies 2012

Last year I created a unicycle cookie cutter and made decorated unicycle cookies. It was a major project and this year I wanted to do it again, but easier.

I decided a stand mixer would help make things easier and it certainly did!

I made up the dough on Sunday and cut out the cookies on Monday. After baking and cooling, they went into the freezer until Wednesday night. While they were freezing, I made up royal icing and read about a different method of using it. Last year I attempted the two step process of flooding and detail work. This year, for some of it, I would use the 20 second rule for applying icing.

Thursday was decorating day. It really did help to have the frosting made up and colored. And in order to color the frosting, I had to have planned out the decorating. My mom was able to join me again and my toddler had a super nap after swimming all morning.

It didn't take too long at all. Perhaps two hours was spent decorating including some clean up. The simplified method of decorating worked well and knowing a bit better what to expect helped too. I wish I had thinned the blue for the saddles a bit more. The thinned black on the saddles worked very well. I started with a larger tip opening and too much icing came out. Switching to a #5 tip worked better.

In addition to the unicycle cookies, I made ovals depicting the Schlumpf logo. Schlumpf is the company who created a geared hub that my husband uses. I also made some square shaped cookies I cut with a fancy cucumber knife. My mom wrote the "MUNI" on them which stands for Mountain Unicycling. The cupcakes are for my husband's birthday which happens to fall on race day.

I enjoy celebrating the great group of unicyclists I've come to know through my husband's hobby.


Sunday, November 13, 2011

Nail Art

In the last year or so, we have gotten into doing nail art. It started with a request from my daughter to have ladybug nails. I looked around the Internet and found a few tutorials. I also learned about nail art pens. Makes doing polka dots easy and fun. We have done ladybugs, unicycles, dots, jack-o-lanterns, and a spider web with a spider.


Recently my niece showed me her water marbled or tie dyed nails. They looked really cool. Nail polish is dropped into water and swirled, who thought of such a thing? She told me there were tons of tutorials out there, so I looked it up. I found this photo tutorial at Chloe's Nail's for water marbled nails. Looked easy enough and not too messy. We tried it. My daughter picked out three colors, I tried two. The effect is really cool.

I wasn't sure about re-doing the nail polish for every nail, so we didn't. The fourth and fifth nails aren't as interesting as the first three, but still look cool. I also wasn't sure about how to dispose of the water and polish mix. After doing the nails I swirled my toothpick in the cup and found all the polish was drier and was sticking to toothpick. Easy clean up too.

We did use clear scotch tape to protect our fingers and that worked well. We taped one hand, prepared polish, then dipped fingers individually, waited a little, removed tape, taped other hand, prepared new polish, dipped, removed tape.

Friday, September 23, 2011

Unicycle Cookies

My husband is a mountain unicyclist. My 7 year old daughter rides a unicycle too. I had looked for unicycle related items in the past and knew there was a limited supply. Last Christmas I found someone who could custom make a unicycle ornament for us. Custom seems to be the key with unicycles.

A unicycle only race was coming up and I thought it would be fun to bring decorated unicycle cookies. I did a Google search for unicycle cookie cutter. No luck.

Then I did a search for custom cookie cutters and I found this little kit. How hard could it be to make a cookie cutter?


It turned out to be pretty easy. I started out on the big side and then scaled the design down.


Then off to the baking and decorating. I decided to make my mom's recipe for gingerbread cookies. They come out great and are very tasty. The recipe comes from Applehood and Motherpie. I also spent a few nap times learning about frosting cookies with royal frosting. I was intrigued. A blog I found called Annie's Eats had many great tips. I even used the recommended recipe for both the frosting and a batch of sugar cookies.

Having three children and one of them under 2, I had to give myself a few days for decorating. My mom was able to come over and give me a hand and we made a great team.

The first challenge was just making the royal frosting. Everywhere I looked the recommendation was to use a standing mixer. Some people even reported having burned out their hand mixers trying to make royal frosting. I looked into buying one, but they are very expensive and I needed it the very next day!

My mom and I decided we would try to use our hand mixers, but we would use two and switch them in and out when the motors felt warm. It worked!

I had bought some new supplies too: squeeze bottles, decorator bags, tips, and gel food coloring.

With my 18 month old on my back, we started with the royal icing on the gingerbread cookies. It took a long time, but we created unicycle cookies!

I still had the sugar cookies to decorate, but I was running out of time. I made up some buttercream frosting and tried a simplified outlining and very quickly they were done too!

I was excited to complete this project and share the unicycle cookies. Of course the other unicyclists seemed to get a kick out of them too.

Tuesday, March 15, 2011

Unicycle T-Shirt

Having two unicyclists in the house, it seems like unicycling is very mainstream, but then I do a search for unicycle gifts and turn up not so much.

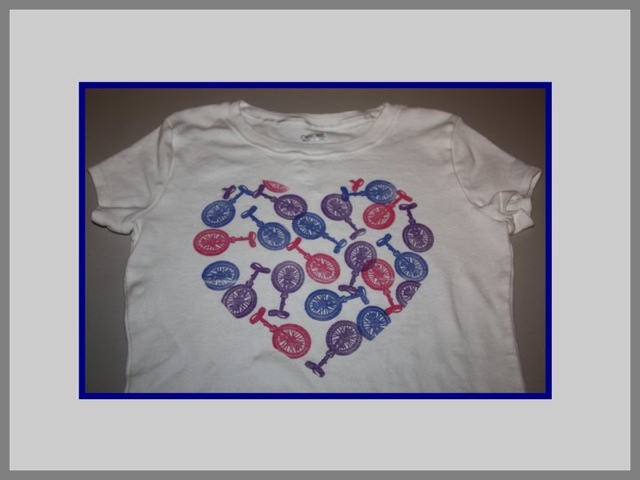
During one of my nap time searches I found a unicycle rubber stamp. I wondered what I could do with that. Then I remembered that there are stamp pads that are permanent, even designed for fabric. Finding them however proved to be difficult. But ordering was not too hard.

I bought a white t-shirt, made a heart template out of cereal box cardboard, and started stamping.

A great way for my daughter to show her love of unicycling.

Tuesday, December 7, 2010

Unicycle Ornaments

Well this I didn't make, but I did help design it. I was looking for gifts for my unicyclists. Each search usually comes up with bicycle. So I was paging through some bicycle gift items at Etsy and thought to ask an artist if they would be interested in designing a unicycle instead.

I picked Heather Boyd because she creates wire sculptures and offers a bunch of different bicycles. She and her husband both were very happy to work with me. I actually noticed the "runner" sculpture and thought that would look neat on a unicycle. I did request too that the tire be knobby, if possible and to have spokes.

I was amazed to see my descriptions from an email come to life. After seeing the first design, I suggested a few minor changes and also asked if a smaller version could be made for my daughter.

I was so happy with the results and pleased with the process too. Thanks to Heather we have not one, but two unicycle ornaments to hang on our tree.