
Friday, November 29, 2013
Happy Thanksgiving
I was asked to bring a veggie tray for Thanksgiving. Recently I had seen a turkey looking veggie platter and thought I'd try to make something similar. I bought vegetables we enjoy and went to work. The cucumber had an interesting end which worked well for a turkey head. Placing the veggies in the tray as I cut them worked well and was surprisingly easy. I used cut toothpicks for the carrot beak and pepper wattle. The raisin eyes are cut raisins that just stuck on.

Friday, November 22, 2013
Neighbor Farewell Quilt
 There had been murmurings of a potential move for some time, but we never heard of any new jobs or move dates. Then just after Halloween we noticed a for sale sign with a sale pending. As the month continued to fly by, I finally caught up with the mom and found out they were leaving in five days! My daughter has spent many afternoons with their daughter and is sad they will move six hours away.
After hearing the news, I looked around the internet for a going away gift idea. One idea was a luggage tag. I liked that idea, but also wanted something with which my daughter could help. My next go to was a quilt. I wondered if my daughter would like that idea. While my daughter slept, I was already forming a quilt in my mind. I hoped to find prints of houses, because we live in the same neighborhood and of bikes, because they ride bikes together and of dolls, because they both enjoy playing with dolls.
I needed something fast and easy. I considered Road Trip pattern and Layer Cake Lemonade Pattern. Finally I found this Big and Tall pattern and decided it would be quickest to purchase the pattern. This would be my first quilt pattern purchased.
The cutting for this quilt went quickly and the sewing went very quickly. I decided to do nine blocks instead of the recommended twelve. Each block has six components. After we formed the blocks, my daughter and I spent some time rearranging them until the colors seemed mostly balanced. After stitching together the blocks and noting that the quilt really goes one way, it seemed more rectangular than square and wider than taller. The next morning, I decided to add a top and bottom strip of purple to make it more a square.
 I had considered making houses for two of the front squares, but I also wanted to put everything together quickly. I had found a wonky house pattern for paper piecing and studied it a bit. Finally I decided to just wing it.
  I started with 3" wide door, a 3" x 3" window, and 3" strips to fill out the house. I ended up trimming the middle and sides. The roof was next, I cut a triangle and then added the sky to one side, then the other. Finally I added sky to the sides of the house and put it together. The last step was to cut the house on an angle and add grass.
 The first house was pretty big, for the second house I started with a 2" wide door and based everything else off that. I wanted it to appear that one house was close and one far away.
Surprising to me was that the piecing of the back took much longer than the front. I used up scraps to frame houses and make up a 60" x 60" back.
 For the "label" we just rubber stamped on the grass of the smaller house and hand wrote the date and location in permanent ink.
 For the "label" we just rubber stamped on the grass of the smaller house and hand wrote the date and location in permanent ink.
Saturday, November 16, 2013
Doggie Attire
 |
| Dog Wetsuit |
In my research, I did see one company who makes custom dog jackets and wetsuits. That might be the way to go for a larger dog.

The coach did give me the dog's coat as another reference for sizing. It is a very simple design. Basically a long piece cut with a contour, a collar and an added strap. I have some amazing Malden Mills fleece leftover from a bag order. It is a thick two sided fleece. I made up another little coat too.

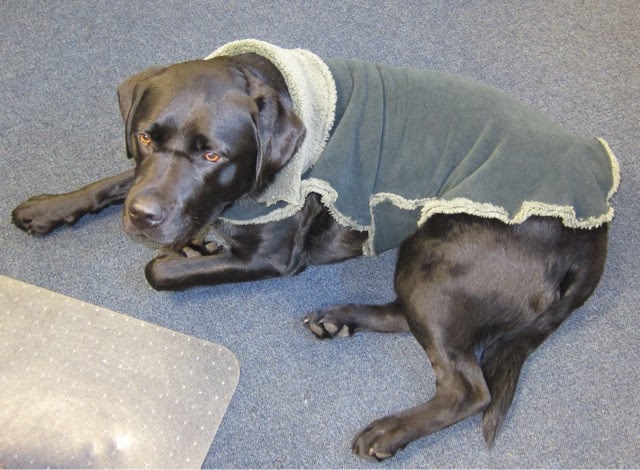 |
| Dog Fleece Coat |
Thursday, November 14, 2013
Dresden Plates and Mug Rugs
A unicycle quilt has been getting new consideration lately. My first thought was that all those curves would be unpleasant, but my second thought was remembering some spoke like quilts I've seen. After checking in with some of my quilting friends, they reminded me that the wheel quilt is called a color wheel or a Dresden Plate. I actually found examples that were quite spoke like.
 I hadn't ever made a Dresden plate quilt. One example I saw used multiple fabrics in each plate. The spoke like wheel utilized striped fabric. I tried out altering the white star print's position and quickly realized it wasn't really working. I added a couple curved accents, but still not great.
 Another try yielded a more wheel like pattern. I kept the white accents in the same position and added a green solid for contrast. And added a second mini wheel. Some Dresden plate quilts add the wheels and embroider them on. I traced the curve, added a 1/4" seam allowance and was able to piece the backing onto the wheel.
 I still had mug rugs on the brain the next day after my Modern Quilt Guild meeting. We will be exchanging mug rugs at our December meeting. They do not need a holiday theme. I started considering leftover pieces from my sewing themed messenger bag. There wasn't much fabric left so I went with a log cabin pattern and added stripes on the side. I also made a pieced binding and quilted with wavy lines. After completing the mug rug, I wasn't sure I wanted to give it up, so I started another with a cool print. There was a tiny bit of the sewing themed print that I added to the back of the new mug rug. For interest I added a single strip of brown in the binding. Quilting again was done with wavy lines avoiding most of the words in the print.
 I hadn't ever made a Dresden plate quilt. One example I saw used multiple fabrics in each plate. The spoke like wheel utilized striped fabric. I tried out altering the white star print's position and quickly realized it wasn't really working. I added a couple curved accents, but still not great.
  Another try yielded a more wheel like pattern. I kept the white accents in the same position and added a green solid for contrast. And added a second mini wheel. Some Dresden plate quilts add the wheels and embroider them on. I traced the curve, added a 1/4" seam allowance and was able to piece the backing onto the wheel.
  I still had mug rugs on the brain the next day after my Modern Quilt Guild meeting. We will be exchanging mug rugs at our December meeting. They do not need a holiday theme. I started considering leftover pieces from my sewing themed messenger bag. There wasn't much fabric left so I went with a log cabin pattern and added stripes on the side. I also made a pieced binding and quilted with wavy lines. After completing the mug rug, I wasn't sure I wanted to give it up, so I started another with a cool print. There was a tiny bit of the sewing themed print that I added to the back of the new mug rug. For interest I added a single strip of brown in the binding. Quilting again was done with wavy lines avoiding most of the words in the print.
 |
| Mug Rug |
 |
| Mug Rug back |
Tuesday, November 12, 2013
Quilted Messenger Bag with iPad Sleeve
 |
| iPad Messenger Bag |
Messenger bags had been on my mind for a while now. My daughter asked for one last spring with her initial on it. I felt a proper messenger bag should have zippers and pockets. I read about recessed zippers and flaps and things. But then she changed her mind.
This bag started with the fabric as many projects do. I was looking for fabric with sewing machines and notions on it and found some. The colors might not have been my first choice, but when I looked closely at the brown, tans and turquoise, it was a good fit.
 My iPad determined the basic size. I began with the back panel ( 12" wide by 10 1/8" tall) and pieced together a strip which I inserted into the sewing fabric. Then I worked on the front panel knowing that it would be mostly hidden under the flap. I inserted a strip in the middle, then added two strips on top. Pockets were the next step. I added one for pens (5 1/4" x 3 1/4" cut on fold) and one small pocket (4 1/2" x 4" cut on fold).
Next I made a front flap (11" x 14 1/4"). While I have made many tote bags, this was my first messenger bag. The front flap and the side strip were new to me. For try front flap, I tried to match up the fabric to the front panel once again piecing a strip and inserting it in the sewing fabric. I went back and forth with the sizing of the panel. After piecing, I decided it needed to be longer. I added a bit to the bottom and then two strips to the top. The one end I did curve the corners before putting it all together. When I was constructing the bag I ended up trimming the sides more. I think leaving the sides the same width as the front panel would be better.
The next panel I made was for the iPad pocket. Ultimately, I trimmed the height of this during construction once the outside bag was together. I just kept testing things with the iPad and parts together. I used two layers of printed fabric with batting with a piece of bias across the top. It is a bit floppy. For all the other panels, I added a layer of craft weight interfacing in addition to the batting and would recommend it for this panel as well. Finished size was 8" x 12".
The side strip was next. I cut a strip 3" wide by 36" added batting (will add craft interfacing also next time).
After making each of these parts, I added the craft interfacing, then a generous piece of batting and quilted them. I did a lot of straight line quilting, but did make some waves too.
I decided to make a strap with brown on one side and printed on the other. By this time I had used up most of the two sewing themed prints. I pieced together a long strap at 3.5" wide and then folded the edges into the center. I did the same with the brown piece and sewed the two layers together with a layer of batting tucked into the print strap.
Next, I cut out the lining pieces out of the brown fabric. Here I wanted to add a pocket (9.5" x 5") and a zippered pocket. I also decided to add a zippered pocked to the flap lining. I used the tutorial and my images from the crossbody purse. All the lining pieces had craft interfacing on the wrong side except the front flap lining. The front flap had slightly rounded edges on the one end.

 |
| iPad Messenger Bag back |
 |
| iPad Messenger Bag front |
Thursday, November 7, 2013
Lincoln Memorial Mini Quilt
While my son has been on his Washington, DC class trip, the chaperones have been posting updates and pictures for us at home to stay connected. The pictures in particular really made a difference for me. There are close to 300 students on this trip and looking through the many photos is a bit like Where's Waldo. But finding your child looking well and accounted for is a great feeling.
After seeing the day 2 of 3 morning photos, I was feeling particularly appreciative and began to consider some sort of thank you gift. I considered food items, gift cards, and sewing something. I first thought of a mug rug. They are mini quilts which are designed to be the perfect size for a hot beverage and a couple cookies, like a snack sized placemat.
 I started planning out the representation with ivory columns opposite yellow strips of fabric for the lights. Finally framing the entire things in black for the night.

From my notes:
ivory columns are cut at 1" by 4"
yellow "lights" are cut at 1.5" by 4"
Top ivory is cut at 8.5" by 1.5"
smaller top is cut at 6.5" by 1.5"
bottom ivory is cut at 9.5" by 2"
black strips cut at 2" and 1.5" fill in around memorial
bound by bringing 1" from back to front and top stitching
Step 1, sew columns and yellow together. I sewed long strips together and then cut into 4" sections. Then sewing the pairings together to form 6 ivory with 5 yellow
Step 2, add first white topper
Step 3, sew 2" black strips on either side
Step 4, add black strips to upper ivory piece and lower ivory piece
Step 5, sew topper and bottom onto middle piece forming memorial
Step 6, add 2" black strips to top and bottom
Step 7, form quilt sandwich
Step 8, quilt decorative stitching for columns and steps
Step 9, trim batting, trim back to extend 1" all the way around
Step 10, form binding and top stitch
finished size is 11" x 11"

A new batch of Pumpkin Cake Balls were made too and everything is ready for gifting! Hopefully the chaperones will enjoy the quilted depiction of the Lincoln Memorial and it will have a home on their desks or on a classroom wall.
 |
| Lincoln Memorial Mini Quilt |
I have made mug rugs for teachers before, usually finding out their favorite colors ahead of time. Because I didn't know their colors or even who beyond their two main chaperones they were exactly, I considered different themes for the mini quilt. Making them flag like with wonky stripes was close in the running. Then I remembered the enthusiasm the principal showed when talking to the parents about this trip. He loves this trip, the places they visit, the restaurants, and especially the illumination tour of the monuments. I started looking at logos for Washington, DC and noted that the Lincoln Memorial would be easy to represent with its flat roof and straight columns.
 I started planning out the representation with ivory columns opposite yellow strips of fabric for the lights. Finally framing the entire things in black for the night.
After looking at images of the Lincoln Memorial and counting twelve columns on the front, I opted for six. Instead of making many stairs, I used a 2" strip and sewed straight lines to depict the stairs. Straight line quilting was also used on the columns. On the top, I used a decorative stitch.

From my notes:
ivory columns are cut at 1" by 4"
yellow "lights" are cut at 1.5" by 4"
Top ivory is cut at 8.5" by 1.5"
smaller top is cut at 6.5" by 1.5"
bottom ivory is cut at 9.5" by 2"
black strips cut at 2" and 1.5" fill in around memorial
bound by bringing 1" from back to front and top stitching
Step 1, sew columns and yellow together. I sewed long strips together and then cut into 4" sections. Then sewing the pairings together to form 6 ivory with 5 yellow
 |
| Quilt Back with year |
Step 3, sew 2" black strips on either side
Step 4, add black strips to upper ivory piece and lower ivory piece
Step 5, sew topper and bottom onto middle piece forming memorial
Step 6, add 2" black strips to top and bottom
Step 7, form quilt sandwich
Step 8, quilt decorative stitching for columns and steps
Step 9, trim batting, trim back to extend 1" all the way around
Step 10, form binding and top stitch
finished size is 11" x 11"

A new batch of Pumpkin Cake Balls were made too and everything is ready for gifting! Hopefully the chaperones will enjoy the quilted depiction of the Lincoln Memorial and it will have a home on their desks or on a classroom wall.
Cake balls with chcolate coating yielding 50 balls has the following nutritional info.
Tuesday, November 5, 2013
Class Trip Preparations
My son is headed off on a three day class trip to Washington, DC. They will be going by bus and it is a long drive. I want the trip to go smoothly for him and tried to think of ways to help. I have encouraged him to always put things away in the hotel room and on the bus to minimize losing things. Having a "home" for his things will hopefully help.
 Food was my first thought. I want him to have snacks for the bus and also in the hotel at night. For the bus ride, containing everything in one spot within his backpack seemed like it would help. I found these nice reusable bags at Target that are clear. I look forward to using them in my bag too. Keeping things together and organized makes things easier! The plastic-like material on these bags is very soft and pliable. These would be pretty easy to make too if I found the right materials.
 Next I decided to make him a luggage tag. Making things for him allows me to feel like a little part of me is along for the trip. I used my even easier luggage tags tutorial. I think sometimes I have taped the plastic to the fabric before sewing it together. Keeping the plastic layer straight inside the two layers of fabric is tricky.

 He will be taking along his iPod and iPod accessories. After deciding not to make a bag, I searched around at Target for a small bag to contain all things iPod. The camera bags were too expensive and not the right size. The lunch sacks were all too big. Finally in the cosmetic department, I found a nice small bag that looked acceptable for a boy. It was approved by said boy and everything fits nicely. Because I'm still concerned about him losing things, I added a leash on the bag tucking it in a small opening near the zipper and stitching through all layers. And while I was in the sewing room, I installed a little loop to hold in his iPod strap and made velcro straps to wrap cords up nicely. The iPod will fit inside as well.


I made a couple last minute additions to his bags. I attached a couple metal clips in the backpacks to attach important things like his wallet, camera, and iPod bag. This way when he pulls put his jacket, the other items won't get pulled out and lost.
Now we just need to hope everything makes it back home!
 Food was my first thought. I want him to have snacks for the bus and also in the hotel at night. For the bus ride, containing everything in one spot within his backpack seemed like it would help. I found these nice reusable bags at Target that are clear. I look forward to using them in my bag too. Keeping things together and organized makes things easier! The plastic-like material on these bags is very soft and pliable. These would be pretty easy to make too if I found the right materials.
 Next I decided to make him a luggage tag. Making things for him allows me to feel like a little part of me is along for the trip. I used my even easier luggage tags tutorial. I think sometimes I have taped the plastic to the fabric before sewing it together. Keeping the plastic layer straight inside the two layers of fabric is tricky.
 He will be taking along his iPod and iPod accessories. After deciding not to make a bag, I searched around at Target for a small bag to contain all things iPod. The camera bags were too expensive and not the right size. The lunch sacks were all too big. Finally in the cosmetic department, I found a nice small bag that looked acceptable for a boy. It was approved by said boy and everything fits nicely. Because I'm still concerned about him losing things, I added a leash on the bag tucking it in a small opening near the zipper and stitching through all layers. And while I was in the sewing room, I installed a little loop to hold in his iPod strap and made velcro straps to wrap cords up nicely. The iPod will fit inside as well.

I made a couple last minute additions to his bags. I attached a couple metal clips in the backpacks to attach important things like his wallet, camera, and iPod bag. This way when he pulls put his jacket, the other items won't get pulled out and lost.
Now we just need to hope everything makes it back home!
Subscribe to:
Posts (Atom)