Showing posts with label gifts. Show all posts

Thursday, September 15, 2016

1st Grade Valences & Sink Curtain

My daughter's new first grade teacher is new to the district and new to first grade.  I sent her an email welcoming her to our school and offered to do some sewing for her.  I was remembering how fun it was to make the Native American props last year and wondered if there would be something similar appreciated this year.  However, I did mention in my email that I could probably be talked into making curtains for the classroom.  I had no idea how many windows she would have though!
First Grade Curtains Valances

Because I had the various curriculum topics on my mind and also remembered one of my favorite projects making Kessa's Kindergarten quilt, I thought it might be fun to include different prints to coordinate with each curriculum topic.  After trying to explain my vision and showing the teacher a small picture from Kessa's quilt, she was on board.  The teacher also requested a curtain to hang under the sink in the classroom.  There was already velcro hanging there.

For the under sink curtain, I just made it 1.5 times the width and just one layer of fabric with all raw edges hemmed.  I added tucks every so often to have it fit the velcro.  I loved that I had extra of the crayon print for some detail.

The first step for the valances was to gather various prints I already owned.  I had been researching the different curriculum topics and started searching for fabric prints for each to buy.  Some topics were easy to consider and for others I needed to think more creatively.  Not every topic is well represented either.  I wanted to include many children's book prints too.  There are so many out there.

Some of my favorite fabric prints I found were chicks for the eggs they hatch in the spring, the many children's books including prints from Eric Carle, Dr. Seuss and Don't Let the Pigeon Drive the Bus.

Each rectangle of fabric was 4.5" x 6.5".  I added in small strips of light blue every four rectangles.  The finished valances are 18" long and I ended up having the front and the back be one continuous piece of light blue connecting at the prints.  My header was 2.5" to be sure to accommodate whatever hanging method the teacher found.  For the side seams I just serged them and folded and top stitched.

Because the large windows were eight feet wide, I opted to sew two separate panels for each.  I did repeat the prints between the two large windows and small single window.  Some repeated more than others.  I also added some basic prints to add variety.  These valances also were 1.5 times the width of the windows.

It was really fun searching for prints and finding old prints of mine.  One red print with dinosaurs and books was from a pair of shorts I made for a toddler friend in 1999!


Tuesday, August 30, 2016

Sewing for a little friend


I wanted to make something for a friend who will be undergoing surgery soon. I tried to think of something I could make to make life more pleasant during this time.

The first thing I considered was a pillowcase. I have made pillowcases before to be donated for hospitalized children. Pillowcases are also a nice gift for any child in their favorite themes. I found out the child's favorite things are My Little Pony and Disney Princesses. 

After making the pillowcase, I had more My Little Pony fabric leftover and decided to make a quiet toy for her too. I made three "I Spy" bean bags with little toys and buttons I thought she would enjoy. 


After delivering our gifts and talking more with her mom, I learned that keeping her well is very important before the surgery and afterwards as well. I remembered seeing a child wearing a surgical looking mask at the bowling ally and wondered about making masks out of fabric. Fortunately, I found an amazing tutorial at Craft Passion. I also saw some people copy paper surgical masks which also seemed doable.  

The Craft Passion pattern was very easy to use. I did need to make the elastic pocket slightly larger after my first attempt. Also, I found it helpful to sew with the elastic tucked into the pocket area. The small fit the four year old well with an 8" elastic tied into a knot. The medium fit a six year old with an 8.5" elastic tied. I tried to cut the prints so the characters were visible on the masks. They came out really cute!
We have a surgical paper mask that is part of a play doctor kit. I copied it as a pattern as is and also made a smaller version. The smaller version is 6.5" wide and 5" tall. I pressed three pleats and then serged all four edges and turned them under. Adding the elastic was the last step and used 6.5" long pieces on each side. 
I wanted to make something for the big sister too. She likes Shopkins and finally has some wiggly teeth!  I made up a little tooth pillow with a felt tooth shape pocket on the pillow. 


Sunday, December 21, 2014

Money Trees

As kids get older, they seem to either want to shop for themselves or be saving for bigger ticket items.  Instead of going the gift card route, I sought out creative ways to gift cash.  I found some money trees and loved the idea!  Who hasn't been seeking a money tree their whole life.

I made some as part of the group gifts for the preschool teachers and also some for the big kids in my life.

First I painted the pots and used floral foam inside the pots.  Polka dots were made with a pencil eraser.

For the round one, I started off with a wooden skewer and a floral foam sphere.  Using folded 5's I took floral wire and wrapped it around the center.  Before inserting it into the foam, I opened up the folded money to make it look more flower-like.  Because I wasn't filling the whole sphere with money, I took some netted ribbon and also folded this and attached with wire.  I took some red berries and attached them too.

For the stick tree, folded money is attached to the wooden skewer with floral wire.  I purchased a bouquet of sparkly stars for the top.

Friday, December 19, 2014

Teacher Gifts

Teacher gifts this year included class gifts for the preschool teachers.  I collected money and had enough for a nice Vera Bradley purse and money tree for one teacher and another money tree along with handmade luggage tag and a key fab for the other teacher.


For my other daughter's elementary school teacher, we purchased some supplies off her list and I made her a new lanyard with ID holder and a key fab.


Of course chocolate was included with all the gifts!

Saturday, November 22, 2014

I Spy Bean Bags

Another birthday party and another opportunity to make a gift. I considered a tote bag or a superhero cape, but I wanted to make something new.

I started thinking about bean bags, which I have made in the past, but with a twist. I liked the idea of making small bean bags with an I Spy window. After goggling I Spy bean bags, I was surprised to find many people making them.

My idea was to make a set of bean bags that would be fun to play I spy with, but also to play with as bean bags. 

I started out with a larger bag (6") and window (4") and ended up remaking them smaller. 

I used a 4.5" back, 2.5" window, and 1.75" strips to frame the window 

These bags went together quickly. I used my Teflon foot to glide easily along the plastic.

For the contents, I found different objects around my house and also from JoAnns.  For each bag, I collected ten different items. 

Saturday, September 20, 2014

Super Hero Birthday

We have a friend who is turning four and is very much into super heroes. This theme has so much potential for gifting. I started brainstorming cape ideas and also offered to make a birthday "4" shirt.

From my stash I had this great Marvel print that was perfect for a birthday shirt. After looking at some other birthday shirts, I saw the idea of having a comic Pow! speech bubble behind the number.  I think it looks cool. I was going to use the Marvel font for the four, but it wasn't right. I ended up using a Super Mario Bros font. 

For the cape, I thought it would be cool to have the birthday boy's first initial on the back in batman colors. My husband suggested the batman shaped bottom edge. I had intended to follow a tutorial I had found earlier this week, but when I laid everything out, the dimensions seemed too small.  I loosely used a cape I had made my daughter last winter and used the plate tracing suggestions from the blog post. 

The "V" is from a superman font and has a great look to it. The circle is from an 8" plate. 

I took a few picture to help me remember the sizing for next time. Also, the points I made along the lower edge ended up being sewn less pointy. The outside is black and the inside is blue.


I asked my daughter to try on the cape a couple times. She was mostly cooperative, but admitted she didn't like the colors much. I asked if she'd come outside and wear it for pictures. She had a ball running around with the big flowing cape on. I think the birthday boy will enjoy it too. In addition, she did put in a request for a pink cape. 

It's been a long time since I've had a little boy and it was fun sewing little boy things. 


Friday, September 5, 2014

Lanyards

I wanted a little something extra for birthday gifts for my nieces.  They are teenagers now and I thought a lanyard might be nice.

Using quilting fabric folding onto itself made this a very simple project.  I opted for no interfacing this time and we will see how they hold up.


I made a shorter version for my keys.  Because it's just fabric, it takes up little space in my pocket.  It's also a good size for looping around my bag or purse handle.

Wednesday, December 18, 2013

Mini Mitt gifts

My sister in law introduced me to these small potholder mitts. I have made some in the past and wanted to make some more this year. I tried a slightly different size this time. I cut rectangles at 8"x5" and then curved the corners. The mitt part is just less than half and cut on the fold and then top stitched. Another new thing I tried was quilting the outside layer along with the thermal batting. I made four sets and used different quilting based on the fabric I was using. 
The musical mitts are for the band teacher. 

I often send a box filled with edible treats and snacks to my brother in law. Hoping he might be fond of mini mitts like his sister, I sought out fabric that might be right for him. I considered some New York Yankees fabric or even some navy, but there weren't many choices. The majority of navy fabrics were with patriotic fabrics. Then I saw this print with the United States sprinkled randomly. I found New York and it was actually near Colorado where he lives. Perfect. For the quilting, I sewed around both New York State and Colorado with white thread and then connected the two with what might be a flight path. For the rest of the quilting, I used navy thread and snaked around. 

The last two sets I made are for my sister in law. I had purchased the fabric before Thanksgiving and hoped to bring them along as hostess gifts, but that did not happen. She really likes these little mitts and appreciates multiple sets. 


Wednesday, December 11, 2013

No-Slip Headbands

No-Slip Headband
What often happens is I hear about something interesting once, then twice, as the third time comes around, I pretty much need to investigate.  A friend was singing the praises of her new no-slip headbands for working out.  They are really cute too.  I considered buying some as gifts for some of the girls in my life, but they start at $15 a piece plus shipping.  Finally after seeing more pictures of them, I did a quick search and found that there are tons of DIY tutorials about making these type of no-slip headbands.

Coupons in hand, I headed off to Hobby Lobby.  They seem to have a better selection of ribbon and according to their website, carry a variety of velvet ribbon.  The construction of these headbands is quite simple.  On top is a layer of decorative ribbon, on the bottom a layer of velvet ribbon which provides the grip, and a 5-6.5" length of 3/8" elastic on the back.  I found many ribbon designs I liked, but restrained myself as the ribbon wasn't on sale this week.  I bought three decorative ribbons and two velvet ribbons.  All of the ribbon was 7/8" wide.

I had measured my daughter's head in the morning all the way around and also from earlobe to earlobe across her forehead.  She is 9.5 years old and I went with 15" of decorative ribbon and 5.5" of elastic.  Using a 1/4" seam allowance I sewed the elastic between the right sides of each end of the ribbons.  Then turning the ribbon so it's wrong sides touching, I top stitched the two ribbons together on the long sides.  Done!  I did experiment with using iron on adhesive tape, but just holding everything together worked fine for me.

These headbands go together very quickly.  I made a couple as gifts, some for my older daughter, some for my younger daughter (13" ribbon, 6" elastic), and one for me (16" ribbon, 6" elastics) to try and soon all the velvet ribbon was gone.  I did dip into my ribbon stash from my hair bow making days for some of these.  I found that if my ribbon was too narrow compared to the velvet, layering two decorative ribbons together worked fine.
Layered Ribbon No-Slip Headband

Next up is another trip to Hobby Lobby.  They had many more ribbon options in the 1.5" width.  I will try sewing two layers right sides together and then flipping.  I probably don't even need to top stitch.  The ends will be a little different and need top stitching to hold the elastic in place, but generally that part doesn't show much.

As far as not slipping, my older daughter was amazed, they really don't slip due to the velvet layer.  Even readjusting the headband tugs at your hair if you're not careful.  To date, my younger daughter won't leave anything in her hair all day, but so far these headbands stay in much longer than anything else.  They are comfortable and stay put.

Thursday, November 7, 2013

Lincoln Memorial Mini Quilt

While my son has been on his Washington, DC class trip, the chaperones have been posting updates and pictures for us at home to stay connected. The pictures in particular really made a difference for me. There are close to 300 students on this trip and looking through the many photos is a bit like Where's Waldo.  But finding your child looking well and accounted for is a great feeling.

Lincoln Memorial Mini Quilt
After seeing the day 2 of 3 morning photos, I was feeling particularly appreciative and began to consider some sort of thank you gift. I considered food items, gift cards, and sewing something. I first thought of a mug rug. They are mini quilts which are designed to be the perfect size for a hot beverage and a couple cookies, like a snack sized placemat. 

I have made mug rugs for teachers before, usually finding out their favorite colors ahead of time. Because I didn't know their colors or even who beyond their two main chaperones they were exactly,  I considered different themes for the mini quilt.  Making them flag like with wonky stripes was close in the running. Then I remembered the enthusiasm the principal showed when talking to the parents about this trip. He loves this trip, the places they visit, the restaurants, and especially the illumination tour of the monuments. I started looking at logos for Washington, DC and noted that the Lincoln Memorial would be easy to represent with its flat roof and straight columns.

I started planning out the representation with ivory columns opposite yellow strips of fabric for the lights. Finally framing the entire things in black for the night. 

After looking at images of the Lincoln Memorial and counting twelve columns on the front, I opted for six. Instead of making many stairs, I used a 2" strip and sewed straight lines to depict the stairs. Straight line quilting was also used on the columns. On the top, I used a decorative stitch. 


From my notes:
ivory columns are cut at 1" by 4"
yellow "lights" are cut at 1.5" by 4"
Top ivory is cut at 8.5" by 1.5"
smaller top is cut at 6.5" by 1.5"
bottom ivory is cut at 9.5" by 2"
black strips cut at 2" and 1.5" fill in around memorial
bound by bringing 1" from back to front and top stitching

Step 1, sew columns and yellow together.  I sewed long strips together and then cut into 4" sections.  Then sewing the pairings together to form 6 ivory with 5 yellow
Quilt Back with year
Step 2, add first white topper
Step 3, sew 2" black strips on either side
Step 4, add black strips to upper ivory piece and lower ivory piece
Step 5, sew topper and bottom onto middle piece forming memorial
Step 6, add 2" black strips to top and bottom
Step 7, form quilt sandwich
Step 8, quilt decorative stitching for columns and steps
Step 9, trim batting, trim back to extend 1" all the way around
Step 10, form binding and top stitch
finished size is 11" x 11"


 A new batch of Pumpkin Cake Balls were made too and everything is ready for gifting!  Hopefully the chaperones will enjoy the quilted depiction of the Lincoln Memorial and it will have a home on their desks or on a classroom wall.

Cake balls with chcolate coating yielding 50 balls has the following nutritional info.


Wednesday, November 7, 2012

The Wheels on the Bus

Well these cookies are not for toddlers, nor are they to commemorate the song, but I can hardly think about buses without thinking of the Wheels on the Bus.

This year our schools changed up the schedules and added new bus routes.  There are kids going to and from the elementary school at least five times a day!  That is a lot of bus routes and bus drivers.

When my son started school, I wanted to drive him.  After some time, I no longer felt the need and began to really appreciate our bus drivers.  I especially appreciated the fact that our driver was always punctual and as far as I could tell never had a substitute.  We have new drivers this year due to the scheduling changes, but so far they are also quite punctual.  I appreciate that.

Bus Gingerbread Cookies
After a bus cookie cutter was purchased, a cookie making afternoon was scheduled.  My mom came to help out with cookies and the toddler.  We zipped through two batches of dough in no time!  I considered trying to make frosting and decorate all in one go.  It seemed possible, so I went for it.

Using my now familiar stand mixer for the dough and then the royal icing was great.  I colored the icing a yellow and orange mixture for the buses and black for details.  I thought I was thinning the icing enough for modified flooding, but after putting it in my squeeze bottles, it wasn't running everywhere.  I went ahead and just did outlining and then deciding to forgo flooding and just make some details with my squeeze bottle.  I never made claim to being an artist...but I think they are ok.  When I peruse images of professional cookies, I do believe they are in my reach, but not this time.  Maybe when I have a sleeping toddler or maybe I  just need to wait until she's a bit older.  I could just need more practice too.

The drivers will surely know what these are.  I hope to catch them before their afternoon runs, well and the morning driver too.  I've attached a note to each bagged cookie letting the drivers know how much we appreciate them and how they keep our kids safe.

A tip for getting the last of the molasses out of the jar:  use a rubber band around the mixer, give a twist, and then around the jar.  This worked great for the last few drops and I didn't have to hold it.  :)

Tuesday, April 3, 2012

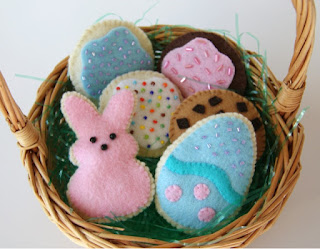
Felt Easter Cookies

bunny, egg, chocolate chip, sprinkle felt cookiesA friend of mine really liked the felt cookies I made and asked if she could order some from me. I said sure!

Easter is right around the corner so I offered some Easter themed cookies in addition to the round ones I had made before.

I found the egg and bunny patterns at the Moody Fashionista blog.

I think the egg is my new favorite.
Kessa delighted with her new egg cookie

Saturday, March 17, 2012

Super Cute Felt Cookies

My sister suggested felt cookies as a nice birthday gift for her daughter's upcoming third birthday. She sent me links to a few options other people had made. I thought they were really cute and probably not too hard to make.

Felt Cookie with sprinkles
I looked through my stash. I had cookie colored felt and beads that would make perfect sprinkles. I started with the tan felt and made two circles. Then I made a smaller frosting-like shape out of pink felt. From there I just sewed the beads in a random sprinkle-like fashion. Sewing the beads onto the frosting and the top of the cookie was enough to connect the frosting to the cookie. Finally I sewed the top of the cookie to the bottom with coordinating thread and used a very small bit of polyfil to give it some body.

After seeing my toddler trying to remove the frosting layer, I decided I needed to place beads even closer to the edge.

I did run out of the tan felt and decided I could use some cream, dark brown, really dark brown fabric and more tan.  After a shopping trip I started on more cookies.

I was excited to try to make chocolate chip cookies. I took scraps of the dark brown felt and tried to make random chips. Each chip was then attached with a few stitches. It was a fun challenge to place the beads and chips in a random looking pattern.

Felt Cookies
Even though I'm not a big fan of sugar cookies in real life, they certainly looked cute in pictures. I used cream felt and found these tiny colorful beads. The package seemed pretty old. I think I've had these a while!

Because St. Patrick's Day was on its way, I decided to also try a shamrock cookie.

I thought of other cookies we like to eat and make. I started a gingerbread man, but didn't like how it was looking. I thought a tree would be nice too. But found that I really like the way the circle cookies look, so I stuck with them. I did try a kiss cookie or a peanut blossom cookie. I'm not sure that's a winner either.

Probably when I finished my first or second cookie, it became clear to me that I would need to make a second set for our house. They were too cute!  Good thing I have an almost two year old in the house.

I saw one set of cookies in a picture that was presented so nicely in a little box. I looked around at Target and JoAnns for small boxes. We actually found a perfect little pink treasure chest gift box at Target, but it was too big for six little cookies.


After looking at cookie and cupcake boxes, I settled on small paper mâché boxes. They seemed a bit more durable than the bakery boxes.

However these little boxes needed some color. I decided to paint them. Painting and drawing have never been my strongpoints and I was reminded of this fact again as I was painting. It was especially hard when the almost two year old wanted to climb on my lap when I was trying to make careful lines and dots. But as they were drying, I decided they will make nice little cookie boxes for two little girls.
Felt Cookies & gift boxes