Showing posts with label rubber stamp. Show all posts

Monday, February 10, 2014

Chocolate Cut Outs & Valentines

The little one and I have recently joined a playgroup. Being almost four apparently means wanting to play with other children and socialize more.

With Valentine's Day approaching, I suggested having a little party complete with a Valentine exchange and decorating cookies. Another mom offered to make cookies also.  I had sought out a chocolate cut out recipe to try.  I'm not a big fan of sugar cookies, but hoped a chocolate version would be better. 


The recipe sounded easy enough and came out well. My family seems to like them. I think adding frosting will improve the taste further. My husband suggested they taste like the outside of a chocolate poptart. 

We found some really cute Valentine sprinkles at Wegmans.  We will do buttercream frosting and sprinkles for the kids. I may frost some with royal icing if there are cookies leftover.

For the Valentine's, I found an example on Google images of using a thumb print monkey with the words, "I like hanging out with you!"  Perfect for playgroup friends!  Kessa decorated the back with stickers and used her new "Kessa" custom rubber stamp.


Sunday, January 12, 2014

Fabric Postcards

At my local Modern Quilt Guild meeting, I learned about fabric postcards.  Back in 2010 when I had my third baby, I actually received a fabric postcard from a friend and was quite impressed with it.  The details, the ability to travel in the mail and the cute factor stood out to me.

I never really considered making my own fabric postcards until at our meeting we decided to draw names and make and send one postcard out for Valentine's Day.  Once I got started with making the one, I didn't want to stop.  They are fun to make and due to their size, a small canvas for trying new things.

For this project, I did purchase Peltex, a stiff interfacing, and a postcard rubber stamp.  Both items I found at Hobby Lobby.  The Peltex they had is fusible on both sides.  I read later that this might be a disadvantage, but it seemed to work well for me.
I did a combination of sewing parts together and also just layering fabrics.  Then after fusing the top layer to the Peltex, I quilted on top to hold everything together.  Finding ribbons and small scraps of fabrics for embellishments was fun too.

After completing the top and quilting, I cut a piece of white fabric and fused it to the back of the postcard.  If I didn't iron too long on the front, the fusible back didn't seem to get activated until I ironed on the back.  Once all the layers were together, I did a satin stitch around the outside once more slowly and a second time faster.  Then using my new rubber stamp, I stamped "Postcard" on the back.

I have read different things about how to mail these.  First class postage seems to work ok, hand stamping at the post office is often recommended.  Some use thin cello bags to protect the mini quilts during shipping.  Because I didn't use any beads or sequins, I think sending them alone may be fine.  Hopefully they will all reach their destinations!

Sunday, May 19, 2013

A Girl Scout Quilt Story

Our Brownie Girl Scout Troop was doing the journey A World of Girls.  In it we talk about how stories are a big part of our world and how they can be told in different ways.  One way is through a quilt.  It was suggested that each girl think of her strength and depict it on a quilt square.  Then together the squares tell the story of the girls in our troop.

Of course this was a project that resonated with me.  I gave each girl a 7" square of muslin, showed some examples and gave them felt and fabric markers to use.  I loved their ideas and how they brought the ideas to fabric.  I told the girls that I would put the squares together for our end of year ceremony and then they could take them home afterwards.

I added a second 7" square of muslin to the backs with serging, then basted the squares on a bigger piece of fabric.  I intend to separate the squares after showing them off at our ceremony.


Wednesday, May 8, 2013

To Boston with Love

Another cool project that the Vancouver Modern Quilt Guild spearheaded is Flags for Boston.  The to Boston with Love Exhibition will be on display at the Museum of Fine Arts from May 23 to June 16.

My Modern Quilt Guild is participating.  Bright colors were encouraged as well as messages of peace and love.

I chose some prints, did some wonky stripes and added a dove like Peace on top with some free motion quilting.


I stamped the back and it went fairly well for my first time stamping.  One upside down letter and running out of space...I think they'll still get it.  :)

To Boston With Love

Tuesday, March 15, 2011

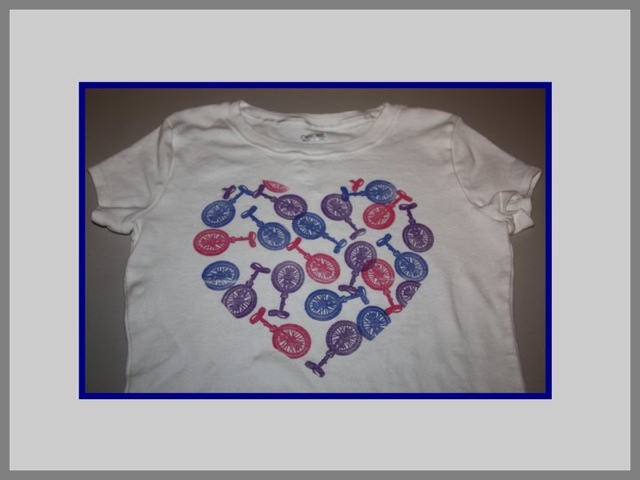
Unicycle T-Shirt

Having two unicyclists in the house, it seems like unicycling is very mainstream, but then I do a search for unicycle gifts and turn up not so much.

During one of my nap time searches I found a unicycle rubber stamp. I wondered what I could do with that. Then I remembered that there are stamp pads that are permanent, even designed for fabric. Finding them however proved to be difficult. But ordering was not too hard.

I bought a white t-shirt, made a heart template out of cereal box cardboard, and started stamping.

A great way for my daughter to show her love of unicycling.

Wednesday, March 22, 2006

Photo Thank You Notes for 2 year old birthday

I always encourage my children to participate in doing thank you notes. Once I had my son paint with watercolors and then once dry, I cut the page into quarters and glued them onto notecards. On the back, I gave him credit with his age.

When my daughter turned two, she received so many lovely gifts and she was more than happy to play with each one for a quick photo. I printed out the pictures, glued them onto card stock and used a ducky rubber stamp on each card to go with our themed ducky party.

I hoped our guests enjoyed seeing their nice gifts again and being thoroughly enjoyed!