Sunday, November 25, 2012

Small Potatoes

My youngest has taken a liking to a couple Disney Jr TV shows. I decided to record one of them for her. After the show, these sweet small potatoes came into view and started singing. Since then, we have become quite fond of the Small Potatoes segment and sometimes even go to YouTube to see our little potato friends.

Of course I wanted to make some Small Potatoes for us. I considered making them three dimensional and tried one like that. It seemed to have too many seams and not enough space for their cute little faces.

Finally today, I just started cutting out shapes. One potato shape, then a second one. My daughter came up to see what I was doing and thought I should make all four potatoes. The potatoes aren't too detailed. The hand sewing of their faces went pretty quickly. I decided to just sew around the edges of them with my machine to speed up the final results.

Everyone in the family seems to agree that we have our own set of Small Potatoes now and that they are pretty cute.  Maybe the youngest will sing on video with her potatoes at some point soon.

Wednesday, November 21, 2012

Quilted Photo Album Cover

When my son was first born, we used film, had the pictures developed, and put them in albums. As we transitioned to a digital camera, we didn't print as many pictures.

When my daughter, Sydney, was born in 2004, we did print a few pictures from her first two weeks. And that is when her album ends. She recently noted that while there are four albums for her brother, she has but one. Also, she spent some time with a friend seeing all of her baby pictures.

Sydney requested we print some of the digital pictures and update her album. We spent one evening searching though old pictures and choosing which ones to print. She doesn't remember many of the pictures and was surprised by the number of pictures.

The Quilted Album
After selecting over a hundred and finding an awesome coupon, they were on their way. I considered finding her a new album that was more her style, then I realized I could simply cover the blue album. She had already found fabrics she liked when we were designing her friend's quilted bag.

Crazy quilting seemed to be the way to go. In a few tutorials, I noted that making the cover a couple inches larger than the album is a good rule of thumb. I cut a template out of white fabric and used that to check my size. Crazy quilting seems to take me longer than other quilt as you go methods.

After adding some thin batting, the backing, and pins, I was ready to quilt. I thought I would probably use decorative stitching along each seam, but then I thought free motion quilting would go more quickly. As I started free motion quilting, I started to form a circle and remembered I indented to try out some pebbling free motion quilting.
The Album Before

At first the pebbles seemed to be dimpling the fabric too much. I changed my tension and perhaps became more comfortable with the technique and it started to go more smoothly.  Pebbling certainly does not take less time, but it was fun to try something new.

The Whole Quilted Album Cover
Close up of Pebbling FMQ
After the quilting, I added unquilted flaps to each side after finishing one long edge on each. After testing out the sizing a few times, I was ready to baste on the flaps. The final step was to add binding to the edges. I used a 2.25" strip folded for the binding and it worked well with a 1/4" seam allowance. After sewing right sides together and tucking the first and last edges, I just folded it over and sewed closely along the folded edge.

Sydney is very happy with her new album and can't wait to fill the pages with cute pictures of herself.


Sunday, November 18, 2012

Floating Blocks in Progress


Bottom left corner
My design wall is working well.  I used yarn to get ideas about where to make divisions.  Also the design wall and yarn are helping me decide which sides to border first and where to line up the blocks.

I was not sure where to start for floating the blocks, but it seems to be going well.

Saturday, November 17, 2012

One of a Kind Quilted Bag

After spending some time out shopping yesterday, I was in no hurry to return. Even though it's before Thanksgiving, the stores and traffic around them seems to be already in the pre-holiday frenzy.

My daughter is attending a birthday party tomorrow and we still needed a gift. She wanted to head out into the shopping frenzy, I suggested making something at home. After some encouraging, she was game.

My daughter is 8 and has some great ideas and a very good sense of color. She drew a purse/bag design and also picked out coordinating colors. The bag would have stripes, a flap with a snap, and a single strap. I suggested making the stripes wonky

It's always fun for me to see how others relate to color. My daughter had a great vision, I simply helped make it happen.

First we made the front and back stripes. Then came the flap. I did some free motion quilting on each piece with loops like the flying ladybugs.

I got out my snap press and added a snap to the flap. After stitching the front to the back and adding the flap, I installed the other side if the snap.

Next came the strap. I just cut a long piece and folded in onto itself.

Putting it all together was pretty easy after double checking the direction of things a few times. I sewed the lining and left a small opening for turning.

Now we have a cute one of a kind bag for a birthday gift. I hope the birthday girl likes it too!

Monday, November 12, 2012

Thanksgiving & Christmas Cookies

A day off from school seemed like the perfect day to do some baking.  My 8 year old daughter seems to really enjoy baking and especially decorating.  Her little sister likes to bake too, but she is more into the experience than actually getting much accomplished.

We now have 18 decorated turkeys for Thanksgiving and some cute Christmas cookies ready for the freezer.  I was looking forward to trying out some new cutters.  While we did get a few houses, snowflakes, trees, and a mitten...I was on oven duty when most of them were being cut out.  We have many more people than I expected.  We can certainly make more if necessary.

It's nice that the kids are at a point where we can bake a whole batch of cookies and at least start the decorating all at once.  We did all the turkeys and a few other things before the one wanted to head outside and the other broke down completely.  After a little break, I was able to finish the decorating. Now who'd like to come over and clean up?!  :)


Sunday, November 11, 2012

Design Wall for Me

It seems the best way to figure out the in between space for floating blocks is to lay out the blocks on a design wall. I had laid out the blocks on my bed, but leaving them there for long periods of time is not realistic.

I saw that some people use flannel and others use thin batting.

There was a decent sale going on for packaged batting and I found one that seemed pretty thin. I hoped that my blocks would stick well enough.

So far so good. Because the batting was thin and light, I used thumb tacks to tack it up. I did end up cutting the batting down a bit for my wall space. It's about 60" wide.

I've seen others who use a foam board and attach the batting to it. For the moment, my solution for a quick design wall is sufficient and I already can see another row of blocks would be a nice addition.

Two blogs I found have nice images for floating the blocks. One Little Imp has a nice image showing where all the seams ended up.
Oh Fransson has a tutorial for floating blocks and how to start dividing the quilt.

The next step will be to add some ribbon to split up the space into manageable blocks.  A grid showing through would be helpful too.  Perhaps someday I will add a foam board with a grid underneath.


Wednesday, November 7, 2012

The Wheels on the Bus

Well these cookies are not for toddlers, nor are they to commemorate the song, but I can hardly think about buses without thinking of the Wheels on the Bus.

This year our schools changed up the schedules and added new bus routes.  There are kids going to and from the elementary school at least five times a day!  That is a lot of bus routes and bus drivers.

When my son started school, I wanted to drive him.  After some time, I no longer felt the need and began to really appreciate our bus drivers.  I especially appreciated the fact that our driver was always punctual and as far as I could tell never had a substitute.  We have new drivers this year due to the scheduling changes, but so far they are also quite punctual.  I appreciate that.

Bus Gingerbread Cookies
After a bus cookie cutter was purchased, a cookie making afternoon was scheduled.  My mom came to help out with cookies and the toddler.  We zipped through two batches of dough in no time!  I considered trying to make frosting and decorate all in one go.  It seemed possible, so I went for it.

Using my now familiar stand mixer for the dough and then the royal icing was great.  I colored the icing a yellow and orange mixture for the buses and black for details.  I thought I was thinning the icing enough for modified flooding, but after putting it in my squeeze bottles, it wasn't running everywhere.  I went ahead and just did outlining and then deciding to forgo flooding and just make some details with my squeeze bottle.  I never made claim to being an artist...but I think they are ok.  When I peruse images of professional cookies, I do believe they are in my reach, but not this time.  Maybe when I have a sleeping toddler or maybe I  just need to wait until she's a bit older.  I could just need more practice too.

The drivers will surely know what these are.  I hope to catch them before their afternoon runs, well and the morning driver too.  I've attached a note to each bagged cookie letting the drivers know how much we appreciate them and how they keep our kids safe.

A tip for getting the last of the molasses out of the jar:  use a rubber band around the mixer, give a twist, and then around the jar.  This worked great for the last few drops and I didn't have to hold it.  :)

Sunday, November 4, 2012

The Start of Something Fun

Probably two years ago I found some fabric with bicycles and unicycles on it by Michael Miller. I thought it might be nice for a birthday shirt for my unicycle riding daughter. She was not interested, but I knew with now three unicyclists in the house I would use it someday.

Almost a year ago I had seen this hoop-like fabric and used some for a tablecloth at a hoop demo.

As the weather gets colder and we spend more time cuddling under blankets, I naturally thought about a quilt.

Googling quilt images is one thing I do from time to time. I get some neat ideas from what others are doing. Many "modern quilts" are making use of negative space.

Using the cycling fabric along with the hooping fabric seemed to be the perfect fabrics to try out some new quilting.

As I was seeking out coordinating fabrics, I remembered how unique the cycling fabric is. The only shade that finally seemed to match was in the fat quarter section. The hoop fabric is predominately pink, which isn't my favorite, but I decided I could bring out the orange and it would work. Both fabrics have white, so that was an easy choice. I didn't want the quilt to have too much white though and sought out a green. The green represents the outdoors for me and how my family enjoys being outdoors.

At first I wasn't sure how all the fabrics might go together. Then I decided to just keep each print separate and use the white to tie everything together.

This is another quilt as I go project which I have come to enjoy. I started fussy cutting the cycling fabric. I wanted to make sure I got at least a couple unicycles. Then I cut strips of the aqua and the white in varying widths. Each block went together quickly and I really liked the effect.

The hoop fabric came next. I found patterns within the fabric to cut around. And once again cut varying strips to border each square and rectangle.

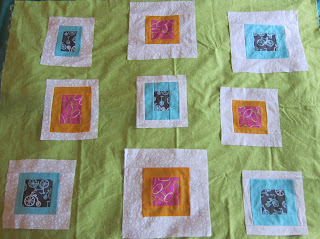
After working on the blocks some of yesterday and today, I figured I had enough to lay them out. Laying the blocks on top of the green gave me a better idea of how it will look. I think I could even make some more blocks for a bigger quilt.
unicycle and hoop quilt
It will be interesting figuring out the in between measurements and deciding on final placements.

One thing I'd like to try soon is quilting on a long arm sewing machine. There is one shop in the area where one can rent time on the machine. Eventually I want to make a queen sized quilt for my bed and use the long arm machine for that. Working on something smaller first would be good practice.

Friday, November 2, 2012

Giant Chocolate Chips

I knew about mini chocolate chips and even have some on hand. I did not know giant chocolate chips existed. I purchased a large bag of chocolate chips thinking they were regular. When I was choosing them, I did read the "double" on the package and just wondered if they were extra chocolatey somehow.

It wasn't until it was time to add the chocolate chips to my banana muffins that I finally opened the bag. It was surprising to see such big chips! As I measured out the regular amount of chips, I wondered how the muffins would turn out. The mini muffins might only end up with a couple chips.

Everything seemed to work out and where the chips landed ended up tasting extra chocolately. It was a nice twist to our favorite muffins.

Gabby the Giraffe

felt giraffeMy young, sensitive preschooler was watching an episode of her favorite show, Doc McSutffins when she stopped it mid-show.  It was the episode called "Arcade Escape" and my daughter was upset that the giraffe was ripped.  She said it over and over.  I suggested we could make a little giraffe and stitch it up.

Together we found a template for a giraffe and then went back to the show to decide on the details for the felt giraffe.  We finished the show and saw that Gabby the Giraffe does indeed have a rip or an open seam and Doc McStuffins and Lambie are able to fix her right up.

It was neat creating felt details for the giraffe to match the tv character.  My daughter helped decide which colors to use for the body and spots.  We also agreed on orange stripes on the giraffe's legs.

Gabby has a lot of details, so we started sewing them on first.  For younger children, sewing the details on makes more sense than using glue.  Once we starting sewing around the edges and adding filling, I could demonstrate what had happened to Gabby in the show.

It was disappointing that it could not be completed in one sitting.  We went off to bed with a few safety pins holding Gabby together because done or not, she is already loved very much.  Then in the morning, I was able to complete Gabby the Giraffe.