Showing posts with label hooping. Show all posts

Wednesday, April 17, 2013

Hula Hoop Display Rack

Hoop storage, PVC furniture, PVCI did a little searching for a hoop rack and found a few references to them.  Some people seem to use clothing racks and I found at least one example of a PVC rack that someone had made.  My handy husband and I were able to come up with a similar design for a PVC hula hoop display rack.

PVC furnitureTogether we figured out how many connectors we would need as well as how much PVC tubing (50').  We decided on 3/4" PVC with the thicker inner wall.  The project didn't cost too much to make and took an evening to cut and assemble.  My husband used a hand saw and we didn't end up gluing it together.  The measurements were based on hoop sizes for the width.  The height of various parts were decided based on testing with hoops.

The rack seems to work very well for my hoops.  I decided to remove the PVC lettering with acetone and decorate the rack with my business name and gaffer tape.

After it was made, I measured my mini van and the rack width and height.  Fortunately, it will fit assembled!  That might have been a good consideration when designing the rack.  The rack width is 42.5" and the height is about 41" and the length is 47.5".
PVC furniture

Sunday, November 4, 2012

The Start of Something Fun

Probably two years ago I found some fabric with bicycles and unicycles on it by Michael Miller. I thought it might be nice for a birthday shirt for my unicycle riding daughter. She was not interested, but I knew with now three unicyclists in the house I would use it someday.

Almost a year ago I had seen this hoop-like fabric and used some for a tablecloth at a hoop demo.

As the weather gets colder and we spend more time cuddling under blankets, I naturally thought about a quilt.

Googling quilt images is one thing I do from time to time. I get some neat ideas from what others are doing. Many "modern quilts" are making use of negative space.

Using the cycling fabric along with the hooping fabric seemed to be the perfect fabrics to try out some new quilting.

As I was seeking out coordinating fabrics, I remembered how unique the cycling fabric is. The only shade that finally seemed to match was in the fat quarter section. The hoop fabric is predominately pink, which isn't my favorite, but I decided I could bring out the orange and it would work. Both fabrics have white, so that was an easy choice. I didn't want the quilt to have too much white though and sought out a green. The green represents the outdoors for me and how my family enjoys being outdoors.

At first I wasn't sure how all the fabrics might go together. Then I decided to just keep each print separate and use the white to tie everything together.

This is another quilt as I go project which I have come to enjoy. I started fussy cutting the cycling fabric. I wanted to make sure I got at least a couple unicycles. Then I cut strips of the aqua and the white in varying widths. Each block went together quickly and I really liked the effect.

The hoop fabric came next. I found patterns within the fabric to cut around. And once again cut varying strips to border each square and rectangle.

After working on the blocks some of yesterday and today, I figured I had enough to lay them out. Laying the blocks on top of the green gave me a better idea of how it will look. I think I could even make some more blocks for a bigger quilt.
unicycle and hoop quilt
It will be interesting figuring out the in between measurements and deciding on final placements.

One thing I'd like to try soon is quilting on a long arm sewing machine. There is one shop in the area where one can rent time on the machine. Eventually I want to make a queen sized quilt for my bed and use the long arm machine for that. Working on something smaller first would be good practice.

Monday, May 28, 2012

Giant Hula Hoops

At one of the places I teach my hoop fitness classes, the owner requested a giant hula hoop. Once when I was making a regular sized hoop, there was a bit extra tubing left on the roll, so I made an extra big hoop. It ended up being about five foot diameter. Though when I showed it to the owner, it was not big enough to be giant.

I did a little research to see how big a hoop I could make and how big is good for hooping. I found the Guinness Book of World Record for the biggest hula hoop. It works out to be about a 16.5 foot diameter. I asked fellow hoopers and searched the internet.

I noticed that the world record hoop looked very hard to use. I found a video of a man using a 10 foot hoop on an elevated tower. He made it look effortless.


Other materials might be better and certainly a nice lightweight aluminum might be perfect, but I decided to go with what was available to me locally. I got 1" tubing with a rating of 100psi. It is not the most rigid tubing, but this also makes it not too heavy.

I decided to start with a ten foot diameter hoop. I spun myself and the hoop a bit and right away the hoop started to bend near the connector. The next try was with a nine foot diameter hoop. It was hoopable, but big and heavy. I decided it would not be a good option. Next was an eight foot diameter hoop. It worked pretty well. Before I cut it down, my daughter took some video of the nine foot hoop and then both of us trying out the eight foot hoop


Mini hoops all the way to an 8' hoop!
The next day I decided to make a seven foot hoop as a second option. It was a bit easier to use.

Before assembling the hoops, my husband had helped me sand down one end of the connectors. This allowed me to easily pull out the one end of the hoop making it collapse easily. Eventually I planned to add a push button connector. In the mean time I just taped the seam together to prevent the hoop from coming apart at the wrong time.

I brought my "naked" temporarily taped together giant hoops to the gym. The owner liked them both! The next steps were to put on the requested sparkle tape and install the button connector. The hoops needed a bit less tape than I had anticipated, which was a nice surprise. I used all of one roll plus some a second roll of 25' roll of sparkle tape and some additional gaffer tape.

Hooping with a seven foot hoop!
I hope everyone who gets to try them will enjoy the giant hoops for a long time! So far they have brought smiles to all the people I have seen try them!

Monday, April 23, 2012

Webster Hoopers @ Community Arts Day

Because I have started a hula hooping fitness class business, I have been looking for ways to get the word out. Recently, I added my web address to the back window of my car.

The Community Arts Day was coming up and my daughter was performing in the talent show. I saw they were accepting exhibitors. I just needed to make up a poster and I also hoped to make a t-shirt with my logo.

I decided to use a trifold board and add images and text to it. It seemed quite tall, so my husband cut it down a bit for me.

I remembered seeing this hoop-like fabric advertised in a JoAnns ad a couple months ago. I hoped I could find it again and use it for a tablecloth. When I first saw it in the ad, I couldn't find a good reason to buy it.

I found the fabric and sewed under the four edges to make a card table sized tablecloth. The colors from the tablecloth then became my theme for the trifold board.

I had given a lot of thought about making a t-shirt. Actually when I needed a logo for my Webster Hoopers, I had already been working on one for a t-shirt. I hoped to do a silk screen or at least make a template and paint inside. But time was running out. I decided to wait and just used iron on letters. The letters worked very well and I heard a lot of people reading my shirt before actually seeing my trifold board.

I contacted Hoopnotica for promotional materials and received some postcards and also a promotional DVD that was perfect to have running at my table. I brought along our mini portable DVD player and used it until the batteries ran out.

The event itself was amazing. After setting up with my toddler in tow, it was time for the talent show. My eight year old daughter, Sydney performed with her unicycle and also hula hooping. She is a natural hooper! Once the show was over, I was back to my table hooping with kids and adults as they passed by. It was a full day of hooping and meeting many great people!

Tuesday, April 10, 2012

Webster Hoopers Window Cling

In February I became a Certified Hoopnotica Instructor and in March I started teaching classes. Little did I realize I was actually starting a business too. I needed a name, logo, website, Facebook page, and advertising.

I started with a website for my Webster Hoopers and created a logo from an image of myself hooping.

Flyers have been handed out and posters hung.

I often have a bunch of hula hoops visible in the back of my station wagon. I wondered if I could have my website address there. I considered purchasing a window cling, but wondered if I could make one.

I remembered I had alphabet stickers that were pretty big. They'd stick the wrong way though. Then I wondered if I could stick the stickers to clear packing tape and then stick the tape to the inside of my window.

I cut out the letters first to see how long it would be and to make sure I had all the right letters. Then I laid out the packing tape and used masking tape to to hold the packing tape in place.

Everything went together quickly. I brought it out to my car and stuck it on the inside of my rear window. Right away it was apparent that the black letters on clear tape was not bright enough. Probably if I had used white letters or a bright color, it might have been fine. But the dark letters faded into the dark interior.

Instead of starting over with letters I don't have, I tried to figure out what else I could do. I contemplated colored tape we have, but all of the backsides are whitish and not great looking. Then I came across some silver tape I had for hoops. It seemed like an acceptable option. I will have to see how long this DIY window cling turned sticker will last.

Tuesday, February 7, 2012

The Extreme Hula Hoop Fort

I posted a while back about the minimalist hula hoop fort. Well this must be the extreme one. I saw an image of one and knew I'd have to try my own.

It was a sunny, snowless, winter day with just enough wind to make it extra tricky, but I was determined.

I assembled all my hoops together and surprisingly I could have made yet a fourth tier. But the wind was threatening to knock it down yet again. Quickly I got them stacked and snapped some pics. I even got a high five and a yay from the little one.

The colors of my image were not popping enough, so I used the app ColorSplash to color just the hoops.


Extreme Hula Hoop Castle

Tuesday, January 10, 2012

More Hooping Jewelry

After making the hoop ornaments, I hoped to make a pendant for myself.  There were smaller 1 1/2" curtain rings, but they seemed too big.

I ordered some smaller black metal rings in 1" and 1/2" sizes.  They both looked very hoop like with tape covering them.  Using my new prism tape gave them an even neater look.

Hula hoop pendants were made and are proudly worn by the girls in my family.  Perhaps someone else will like the larger sizes at my Etsy store.
Hula Hoop Necklaces with 1/2", 1" and 1.5" rings

Monday, January 2, 2012

Hooping meets Babywearing

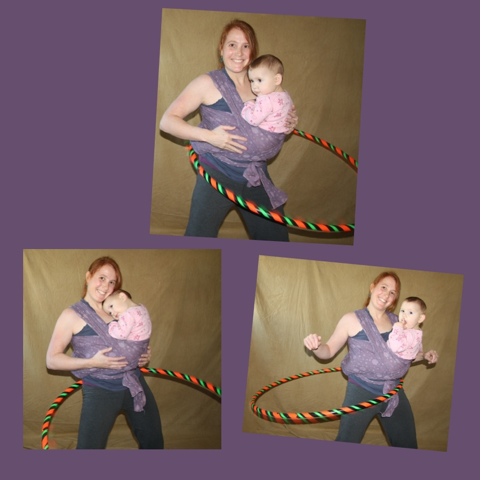
The one thing I always found a bit challenging with hooping is having a baby or toddler around. For one they can walk into a hoop and get hurt and secondly, they might just need to be held at the very moment that I want to be hooping.

As my baby has gotten older, I wondered if I could hold her a bit as I hooped. I first tried her on my shoulders. It worked ok, but she didn't always like it or feel secure up there.

Just recently she really needed me to hold her and I really wanted to hoop for a couple more songs.

My girls had been playing "puppy" with one of my baby carriers and it was still out. It is called a wrap and is just a long piece of fabric, almost six yards long and close to twenty inches wide. I wondered if I could actually tie my toddler up high enough and hoop at the same time.

It did work and I got a great workout. She weighs twenty-six pounds and I certainly felt it!
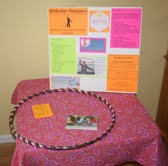
Hooping Meets Babywearing

I thought I'd write down what I did in case any other hoopers find themselves really wanting to hula hoop with a toddler. Please always use your best judgment when considering Babywearing while hooping.

Find the center of the wrap (1) and place it high on your chest (2).

Bring the long ends to the back and cross them behind your back (3) and then over each shoulder (4).

Pick up your child (5) and place them in the center of the wrap (6) while still holding on to the child.

Grab each long end from over your shoulders and hold them tight while also keeping an arm on the child (7).

Cross the wrap over the child's back (8) and under their legs towards your back. Secure the wrap behind you for a moment.

Now reach around yourself to each side of yourself and tuck the child's legs into the wrap (9&10). My child is 21 months and her legs are quite long. I do not know at which ages this would work well. You will have to make your best judgement.
Toddler all wrapped up in a wrap
While keeping the straps tight again and keeping an arm around the child, untie the back and tighten if necessary. My wrap is long enough to cross over in the back and then bring the ties around front for a square knot (11&12). The child should feel very secure and the wrap should be reasonably tight.

These instructions are provided to give you ideas. I am not a professional and do not accept liability. Please use good common sense. Thank you.

Wednesday, December 28, 2011

The Minimalist Hula Hoop Fort

Once we started having a bunch of hoops around the house, my kids started making hula hoop castles or forts. They had learned about them in gym class. They are fun to play inside, topple over and can have a blanket or sheet over the structure for a secret hideout.

My sister saw a picture of one with my girls inside and thought she'd love some hoops to make a fort at her house.

My daughter often would use all our hoops for her castle. I wondered how many you really need. It seems that six is commonly used. Five works pretty well in the grass. I wondered if I could make it work with four.

When I set up four in the house, it looked ok until anyone came close and then it toppled over. I decided to make a little Velcro strap to hold the two hoops making an upside down "V". It worked! Four hoops and a little Velcro becomes the minimalist hoop fort. This little fort also makes my niece and nephew very happy. :)

Tuesday, December 27, 2011

Hula Hoop Ornament

Another Google search did not yield what I was looking for...so I made it myself! I ended up with metal shower curtain rings, removed the small hooks and applied cut hoop tape. This one is a gift, can't wait to make another hoop ornament to put on our tree!
Hula Hoop Ornament

Saturday, November 19, 2011

Patchwork Hoop for Kessa

Kessa always wants to help when I am taping hoops. Sometimes I give her a scrap of tape hoping to appease her. She tries to find a place on the hoop for the scrap of tape.

This gave me an idea. I hadn't made a hoop just for Kessa before. She's not even 20 months yet. But she has been practicing with the hand hoops I made and is getting quite good at getting the hoop to spin around her a few times.

I cut and connected a small hoop for Kessa and told her it was for her. Then I sat down to do the taping and cut a small piece off. I kept cutting off little pieces alternating colors. We kept this up for a while. Kessa was delighted to be working on her hoop and actually applying tape. As the hoop was getting covered it reminded me of the children's book character, Elmer the Patchwork Elephant. She lost interest for a little while and I continued with the patchwork design. It was also a good use of my orange that was almost gone.
Patchwork Hoop

Thursday, November 17, 2011

Hoop Jewelry

Having spent a great evening hooping with my daughter, I still had hooping on my mind in the morning. I thought having some hoop jewelry would be really neat and a super conversation starter!

I did a search for hula hoop earrings and didn't see anything like I had in mind.

As I was considering possible hoops for earrings, I remembered the black jelly bracelets of my youth. They would make neat hoops too.

Along with my toddler, we started at Lowes. I planned to check out o-rings for earrings. As soon as I was looking at them, my toddler called out hula hoop! They were perfect.

I picked up some jelly bracelets too.

Once home I took my hoop tape and cut it down to 1/8" and wrapped the "mini hoops". They are all very cute!

Mini hoop earrings and mini hoop bracelets

Saturday, October 15, 2011

Hoop castle

The kids learned about hula hoop castles in gym class. You only need four to make it work, but if you are seven years old and have tons of hoops at your disposal, they ALL can be used!

When not used in castle construction, you can see us all hooping in the yard and inviting our neighbor friends over for hooping fun!

Thursday, October 13, 2011

More Hooping!

My whole family is hooping! I finally decided to go ahead and make myself the exercise style hoop that I wanted to make more than a year ago.

Back to Lowes. This time buying 100 feet of 160psi 3/4" black irrigation tubing. I wasn't sure how many hoops I'd be making, but knew I wanted one or two and maybe these would make perfect gifts.

More cutting, heating, connecting and taping. I have become more proficient and confident in my taping and tried out some different patterns and mixing wide and narrow tape. The wide tape I just tore in half and the other half just stayed stuck on the roll.

My daughter had a birthday party coming up and I thought, why not! Hoops for everyone! Back to the Lowes, ordered more tape and more hoops were made!

I also decided to work with the mini 1/2" 125psi tubing for hand hooping and performance hooping. I see a potential talent show act in our future.


Sunday, October 9, 2011

Hula Hoops

Well I guess we're not calling them "hula" hoops anymore, but it's sometimes hard to remember.

I learned about this style of hoop form a friend of mine who very successfully changed her lifestyle and lost more than 100 pounds.  Hooping started it for her.  I thought why not?

But it took me more than a year to actually make my own and the first ones weren't for me at all.  My little Brownie Girl scouts come down to the cafeteria on Friday afternoons after a busy week of school.  They would like nothing more than to race around the cafeteria for an hour, but that is not on the agenda.  I wondered if these new, improved, exercisey hoops would help.

I headed over to Lowes for black irrigation tubing.  I found what I was looking for and perplexed the staff.  They had never heard of making hula hoops out of irrigation tubing.  I started with 100 feet of 3/4" 100psi tubing.  I learned about making hoops form the many tutorials out there.  I read about different options for tape and decided to order the gaffer tape.

Both Jason Unbound and Karen Tiede have helpful tutorials and information on hoop making.

My husband already had a pair of cutters for the tubing and also a heat gun which made the connectors slide in easily.  Taping went pretty well.  I certainly got better as I went along.

Ten hoops later and we were hooping!  I made 9 smaller ones for the girls and one big one for me.

The Brownie Girl Scouts LOVED the hula hoops!  It made the transition from school to scouting go much more smoothly.  We also used the hoops at the end of the meeting when kids are being picked up.