Saturday, November 16, 2013

Doggie Attire

Dog Wetsuit
We don't have a dog, but I heard my daughter's gymnastics coach mention that his dog outgrew her doggie wetsuit. I thought I could help out. My first thought was to use a child sized wetsuit and alter it for a dog. This lab is pretty big with a 31 inch "waist". It looked like a bigger wetsuit might work. I cut off the legs to see if it work fit, then we cut off the arms and cut open the zipper. With all the extra leg and arm pieces, I was able to modify the original too small wetsuit.  After trying it on, I need to make darts in the new panels.  The front part of the wetsuit was too small, the back fits well. Creating one out of the bigger wetsuit was not perfect. I'll need to test it on the model, but it think the arm holes are going to be too big.  We had considered using wide Velcro staps across the back for fasteners.

In my research, I did see one company who makes custom dog jackets and wetsuits. That might be the way to go for a larger dog.

Dog Fleece Coat
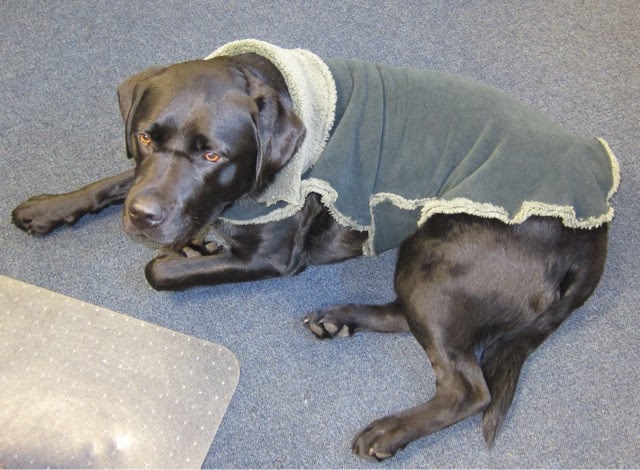
The coach did give me the dog's coat as another reference for sizing.  It is a very simple design. Basically a long piece cut with a contour, a collar and an added strap. I have some amazing Malden Mills fleece leftover from a bag order. It is a thick two sided fleece.  I made up another little coat too. 

Thursday, November 14, 2013

Dresden Plates and Mug Rugs

A unicycle quilt has been getting new consideration lately. My first thought was that all those curves would be unpleasant, but my second thought was remembering some spoke like quilts I've seen. After checking in with some of my quilting friends, they reminded me that the wheel quilt is called a color wheel or a Dresden Plate. I actually found examples that were quite spoke like.

I hadn't ever made a Dresden plate quilt.  One example I saw used multiple fabrics in each plate. The spoke like wheel utilized striped fabric. I tried out altering the white star print's position and quickly realized it wasn't really working. I added a couple curved accents, but still not great. 


Another try yielded a more wheel like pattern. I kept the white accents in the same position and added a green solid for contrast. And added a second mini wheel.  Some Dresden plate quilts add the wheels and embroider them on.  I traced the curve, added a 1/4" seam allowance and was able to piece the backing onto the wheel. 


I still had mug rugs on the brain the next day after my Modern Quilt Guild meeting. We will be exchanging mug rugs at our December meeting. They do not need a holiday theme. I started considering leftover pieces from my sewing themed messenger bag. There wasn't much fabric left so I went with a log cabin pattern and added stripes on the side. I also made a pieced binding and quilted with wavy lines. After completing the mug rug, I wasn't sure I wanted to give it up, so I started another with a cool print. There was a tiny bit of the sewing themed print that I added to the back of the new mug rug. For interest I added a single strip of brown in the binding. Quilting again was done with wavy lines avoiding most of the words in the print.
Mug Rug
Mug Rug back


Tuesday, November 12, 2013

Quilted Messenger Bag with iPad Sleeve

iPad Messenger Bag
I have never been much of a purse person, though I've always appreciated a good bag.  I've made some tote bags and my quilted crossbody purse that I use regularly. Sometimes I want to bring my ipad along and need extra space. 

Messenger bags had been on my mind for a while now. My daughter asked for one last spring with her initial on it. I felt a proper messenger bag should have zippers and pockets.  I read about recessed zippers and flaps and things. But then she changed her mind. 

This bag started with the fabric as many projects do. I was looking for fabric with sewing machines and notions on it and found some. The colors might not have been my first choice, but when I looked closely at the brown, tans and turquoise, it was a good fit. 


My iPad determined the basic size. I began with the back panel ( 12" wide by 10 1/8" tall) and pieced together a strip which I inserted into the sewing fabric. Then I worked on the front panel knowing that it would be mostly hidden under the flap. I inserted a strip in the middle, then added two strips on top. Pockets were the next step. I added one for pens (5 1/4" x 3 1/4" cut on fold) and one small pocket (4 1/2" x 4" cut on fold). 

Next I made a front flap (11" x 14 1/4"). While I have made many tote bags, this was my first messenger bag. The front flap and the side strip were new to me. For try front flap, I tried to match up the fabric to the front panel once again piecing a strip and inserting it in the sewing fabric. I went back and forth with the sizing of the panel. After piecing, I decided it needed to be longer.  I added a bit to the bottom and then two strips to the top.  The one end I did curve the corners before putting it all together.  When I was constructing the bag I ended up trimming the sides more. I think leaving the sides the same width as the front panel would be better. 


The next panel I made was for the iPad pocket. Ultimately, I trimmed the height of this during construction once the outside bag was together. I just kept testing things with the iPad and parts together.  I used two layers of printed fabric with batting with a piece of bias across the top. It is a bit floppy. For all the other panels, I added a layer of craft weight interfacing in addition to the batting and would recommend it for this panel as well. Finished size was 8" x 12".
The side strip was next. I cut a strip 3" wide by 36" added batting (will add craft interfacing also next time). 

After making each of these parts, I added the craft interfacing, then a generous piece of batting and quilted them. I did a lot of straight line quilting, but did make some waves too. 

I decided to make a strap with brown on one side and printed on the other.  By this time I had used up most of the two sewing themed prints. I pieced together a long strap at 3.5" wide and then folded the edges into the center.  I did the same with the brown piece and sewed the two layers together with a layer of batting tucked into the print strap. 
Next, I cut out the lining pieces out of the brown fabric. Here I wanted to add a pocket (9.5" x 5") and a zippered pocket. I also decided to add a zippered pocked to the flap lining. I used the tutorial and my images from the crossbody purse. All the lining pieces had craft interfacing on the wrong side except the front flap lining. The front flap had slightly rounded edges on the one end. 


iPad Messenger Bag back
For assembly, I added the side strip to the front peanel, then added the back panel. I did the same with the lining, layering the iPad pocket to the back lining and leaving a small opening (4"-5") in the seam of the side strip and the front lining.  Then it was time to put everything together.  I placed the bag inside the lining, then added the strap and finally lining up the flap so it would be attached right sides together to the back of the bag. Turning the bag out the small opening was a little tricky due to all the interfacing and batting. Finally I pressed the top edges and inside as far as I could go and top stitched around the top edge of the bag being mindful of the strap and front flap. 

iPad Messenger Bag front
This bag came out well. I had perused some messenger bag tutorials, but none stood out as one to make. I did note the ease of adding the side strip.  That was a concern of mine. I did not curve the bottoms of my front and back pieces. I just didn't consider it, but that may make the side strips go on ever easier. An adjustable strap would be a nice addition as well. I didn't have any hardware on hand and like the simplicity of a fixed strap. But I did try out different strap lengths (with my ipad inside the bag) before settling on this length. Another thing I skipped was a front flap fastener. When I use messenger bags, I rarely close them, but it may be nice to have a closure if some sort, perhaps a hidden magnetic closure. 


Thursday, November 7, 2013

Lincoln Memorial Mini Quilt

While my son has been on his Washington, DC class trip, the chaperones have been posting updates and pictures for us at home to stay connected. The pictures in particular really made a difference for me. There are close to 300 students on this trip and looking through the many photos is a bit like Where's Waldo.  But finding your child looking well and accounted for is a great feeling.

Lincoln Memorial Mini Quilt
After seeing the day 2 of 3 morning photos, I was feeling particularly appreciative and began to consider some sort of thank you gift. I considered food items, gift cards, and sewing something. I first thought of a mug rug. They are mini quilts which are designed to be the perfect size for a hot beverage and a couple cookies, like a snack sized placemat. 

I have made mug rugs for teachers before, usually finding out their favorite colors ahead of time. Because I didn't know their colors or even who beyond their two main chaperones they were exactly,  I considered different themes for the mini quilt.  Making them flag like with wonky stripes was close in the running. Then I remembered the enthusiasm the principal showed when talking to the parents about this trip. He loves this trip, the places they visit, the restaurants, and especially the illumination tour of the monuments. I started looking at logos for Washington, DC and noted that the Lincoln Memorial would be easy to represent with its flat roof and straight columns.

I started planning out the representation with ivory columns opposite yellow strips of fabric for the lights. Finally framing the entire things in black for the night. 

After looking at images of the Lincoln Memorial and counting twelve columns on the front, I opted for six. Instead of making many stairs, I used a 2" strip and sewed straight lines to depict the stairs. Straight line quilting was also used on the columns. On the top, I used a decorative stitch. 


From my notes:
ivory columns are cut at 1" by 4"
yellow "lights" are cut at 1.5" by 4"
Top ivory is cut at 8.5" by 1.5"
smaller top is cut at 6.5" by 1.5"
bottom ivory is cut at 9.5" by 2"
black strips cut at 2" and 1.5" fill in around memorial
bound by bringing 1" from back to front and top stitching

Step 1, sew columns and yellow together.  I sewed long strips together and then cut into 4" sections.  Then sewing the pairings together to form 6 ivory with 5 yellow
Quilt Back with year
Step 2, add first white topper
Step 3, sew 2" black strips on either side
Step 4, add black strips to upper ivory piece and lower ivory piece
Step 5, sew topper and bottom onto middle piece forming memorial
Step 6, add 2" black strips to top and bottom
Step 7, form quilt sandwich
Step 8, quilt decorative stitching for columns and steps
Step 9, trim batting, trim back to extend 1" all the way around
Step 10, form binding and top stitch
finished size is 11" x 11"


 A new batch of Pumpkin Cake Balls were made too and everything is ready for gifting!  Hopefully the chaperones will enjoy the quilted depiction of the Lincoln Memorial and it will have a home on their desks or on a classroom wall.

Cake balls with chcolate coating yielding 50 balls has the following nutritional info.


Tuesday, November 5, 2013

Class Trip Preparations

My son is headed off on a three day class trip to Washington, DC.  They will be going by bus and it is a long drive.  I want the trip to go smoothly for him and tried to think of ways to help.  I have encouraged him to always put things away in the hotel room and on the bus to minimize losing things.   Having a "home" for his things will hopefully help.

Food was my first thought.  I want him to have snacks for the bus and also in the hotel at night.  For the bus ride, containing everything in one spot within his backpack seemed like it would help.  I found these nice reusable bags at Target that are clear.  I look forward to using them in my bag too.  Keeping things together and organized makes things easier!  The plastic-like material on these bags is very soft and pliable.  These would be pretty easy to make too if I found the right materials.

Next I decided to make him a luggage tag.  Making things for him allows me to feel like a little part of me is along for the trip.  I used my even easier luggage tags tutorial.  I think sometimes I have taped the plastic to the fabric before sewing it together.  Keeping the plastic layer straight inside the two layers of fabric is tricky.


He will be taking along his iPod and iPod accessories.  After deciding not to make a bag, I searched around at Target for a small bag to contain all things iPod.  The camera bags were too expensive and not the right size.  The lunch sacks were all too big.  Finally in the cosmetic department, I found a nice small bag that looked acceptable for a boy.  It was approved by said boy and everything fits nicely.  Because I'm still concerned about him losing things, I added a leash on the bag tucking it in a small opening near the zipper and stitching through all layers.  And while I was in the sewing room, I installed a little loop to hold in his iPod strap and made velcro straps to wrap cords up nicely.  The iPod will fit inside as well.


I made a couple last minute additions to his bags. I attached a couple metal clips in the backpacks to attach important things like his wallet, camera, and iPod bag. This way when he pulls put his jacket, the other items won't get pulled out and lost. 

Now we just need to hope everything makes it back home!


Thursday, October 31, 2013

Amelia Bedelia Costume

I haven't dressed up for Halloween in a while.  One of the parent volunteers suggested we all dress up for the school party.

There was a Fasching Party I dressed up for last February and spent some time considering costumes.  For that one I decided to go as a photographer/safari goer mainly because I could wear fairly normal clothes and take lots of pictures.

But when I looked at costume ideas, I looked for ones that were redheaded.  Amelia Bedelia was one of them.  This costume seemed to make the most sense for a school party though.

I headed over to Savers to get some second hand clothes.  Initially I planned to get a black dress, but I found an A line skirt I really liked and then got a knit black top and white blouse.  Sadly, I did not own any of those items.  I purchased white fabric to make an apron and used a black headband with black cardstock paper to make the hat.  I had a hard time finding flower daisies, but a very sweet senior couple helped me out and found yellow flowers that were close enough.  These flowers had long stamens, I simply removed them and hot glued a white felt circle instead.

The apron was not a quick make.  I had hoped it would be, but I had certain elements I wanted it to have.  I started with a gathered skirt and added a 4" ruffle at the bottom.  Then I created a waist band and made smaller ruffles to go next to the straps and upper part.  Every picture I found of Amelia Bedelia shows the back of her apron with the back crossed.  So I created long straps that would cross in the back and then I tucked them through a small belt loop sewn into the waist band and finally ending with a bow in back.

The mechanics of adding a ruffle, then turning or not turning the straps was difficult to figure out.  I ended up doing a lot of turning under a 1/2" and pressing, then sewing wrong sides together.  That seemed to be the easiest.  The whole project probably would have taken less time with a proper pattern and instructions.  But it was completed well before bedtime and that was my goal.

Wednesday, October 30, 2013

Halloween Taboo Game

As Halloween approached, I was on the lookout for some activities for my daughter's fourth grade Halloween party. There are some great ideas out there. One was a talking game where certain halloween words had to be avoided. Another site simply suggested a Halloween taboo game. I've always enjoyed the game Taboo. I think it's great to make yourself think in different ways. 

Searching specifically for a Halloween Taboo game didn't yield the results I had hoped. Finally I decided to create my own game. I started with basic Halloween words and then borrowed some from Halloween word searches. Once I got started, the words came quickly to me. I only have three "taboo" words per card because I know it can be a tricky game for younger kids and even some adults!  At least knowing the topic should probably help too. I ended up with forty cards adding in some fall topics. I'll bring along a timer as well. 

I printed on orange card stock and then laminated the cards.  Hopefully the kids will enjoy the game as much as I anticipate liking it.

I have PDFs of the cards and can send them out via email, just let me know.