My almost 3 year old is more into Disney than my other kids ever were. A Minnie Mouse themed birthday shirt seemed like the right choice for her. I found the Minnie Mouse print first, but cutting out a three, not much of Minnie would show. Small prints work best with the number shirts.
A red polka dot was a better choice for a three. I considered adding a Minnie Mouse ruffle to the shirt and a pair of pants. My little one loves dresses and skirts and I had just the right amount of Minnie Mouse fabric for a full skirt. I added more red polka dot on the bottom edge and some black ribbon on the seam.
Now we are all set for 3!
Monday, March 25, 2013
Wednesday, March 20, 2013
Carrot Pineapple Muffins
A pregnant friend was coming to town and requested low glycemic offerings if possible. I didn't know much about that, but thought I could look at some recipes. Avoiding sugar and white flour seemed like good bets.I found this first recipe using dates and bananas for sweetening. That sounded interesting. I wanted to add pineapples to the recipe as well and sought out other recipes like this one. Finally I decided to combine parts of each and create a new recipe.
Doubling a muffin recipe is usually a good idea for my family, especially if I plan to take the majority out of the house.First blend together
20 dates
2 cups of mashed banana (about 3 bananas)
In a bowl combine the banana dates mixture with
2 eggs
2 Tbsp of olive oil
2 tsp vanilla
add the dry ingredients and mix until just incorporated
2 tsp cinnamon
1/2 tsp nutmeg
1/2 tsp ginger
2 tsp baking powder
2 tsp baking soda
2 cups whole wheat flour
1 cup oat flour (blended oats in blender)

Finally fold in
3 cups of shredded carrots
1 cup of golden raisins
1 cup of drained crushed pineapple (loses almost half by draining, I started with a 20 oz can)
Divide batter into sprayed muffin pans. I got 24 mini muffins and 12 regular sized muffins.
Bake at 350 degrees for about 14 minutes for minis and 23 for regular. They are done when a toothpick inserted comes out clean.
These muffins came out very sweet, moist and delicious! I bet I could reduce the dates further.
Nutrition facts are for one regular sized muffin. Mini muffins would be halved.
Thursday, March 14, 2013
Quilted Name Tag
For my Modern Quilt Guild, we were asked to make ourselves a name tag for meetings. I had missed a couple meetings, but wanted to get to the next one. I had wanted to try a landscape quilt and figured making a super mini quilt as a name tag would be a great way to practice.Because this won't be washed, I was less concerned about raw edges. I went with fusing the layers with iron on fusing and lots of stitching.
I made lines on the blue water and did pebbling on the grey. After quilted the mini quilt, it seemed too big. I cut it down a little and added my name and made tiny spirals. It was nice to use my regular machine for free motion quilting and see that I can make careful stitches, even with a wiggly girl in my lap. I had used my new HQ 16 for spirals the day before and noticed they were not very smooth. More practice at playing with the different speeds will probably make a big difference.
Wednesday, March 13, 2013
Rainbow Shamrock Mini Quilt
I had no intention of making a St. Patrick's Day quilt, I didn't even have any themed fabric. But when I saw this rainbow shamrock fabric at 50% off, I was drawn to it. The rainbow fabric inspired me the most and I purchased solid fat quarters to coordinate.
I started with a 16.5" square of the rainbow fabric and added a shamrock, with an additional white shamrock outlining the green. Then I made 2.5" strips of the rainbow solids. I hadn't ever needed this trick before, but it sure works nicely. After sewing strips together, I cut across them making rows of squares. The squares are even and it was much faster than putting tiny squares together.
When I practice free motion quilting on small quilt sandwiches, it really doesn't have the same effect as on a bigger piece. I wondered if I could have success using my new HQ 16 beast for this small project. I tried out some spirals and echo quilting and my stitches were not too even. This was the perfect project for trying things out and realizing I need even more time practicing. It seems so different on the HQ 16 because I set the speed and then just go. With my regular machine, I slow down and speed up depending on what I'm doing. I did make spiral shamrocks at each corner which are somewhat recognizable.
After finishing the mini quilt, I had a bunch of rainbow squares leftover. I split them each down the middle and have been playing around with what to do with them. I may make a small rainbow wall hanging, we'll have to see.
Friday, March 8, 2013
9 Year Old Birthday Party
![]() |
| "9" Birthday Shirt |
We scheduled the party for a Sunday afternoon through dinner time. As the four guests arrived, we started with the cupcake decorating. My daughter and I had prepared buttercream frosting and mixed a few colors. We set up purple for frosting and a few decorating bags. Some girls spent a long time decorating while others stuck to more simple designs. I set the cupcakes aside on a tray for later. Next we made pizzas. Each girl received a mini pizza shell on a dinner plate. I had many toppings and tomato sauce. The majority just wanted cheese so that was easy.
While we waited for dinner, it was time to make bracelets. Each girl got a wire about twice as long as needed. We had letter beads and many different colored glass beads. A small paper plate kept beads from rolling everywhere. Once they were done, they headed to the basement to play Just Dance while I attached the clasps.
Then it was time for pizza! The girls enjoyed their custom pizzas and chatted about what to do next. We still had nails to do and another project. Sydney explained the choices. It was decided that nails were next!We have a decent collection of polish and nail art accessories. Some girls felt very comfortable doing their own nails, while others wanted some help. My daughter and another asked for leopard spots, so I did those. Another wanted black polka dots, I helped with that too.
After the nails were dry, they played a bit more, then we had the cupcakes.
Finally, we moved onto opening presents and nearby we had the last craft project set up. These nine and eleven year old girls were quite self sufficient. We had felt, printed felt, embroidery floss, ribbon, and jewel stickers. My daughter planned to make little layered squares with her initial on it. I also made up an example of a tiny tote bag with a ribbon handle. Most of the girls made the little totes. It was also nice to see the experienced sewers helping the less experienced.
Our party was three and a half hours long and it was just right. I wasn't sure if we had too many sit down activities, but for this group, it was the perfect party. The two little breaks when they went in the basement and had some free time seemed to balance it all out.
Monday, February 18, 2013
Making Cornbread Mix Go Further
I was invited to make a soup, chili or something to go with it for a pot luck event. Not having a great soup recipe, I considered side items. Having two boxes of Jiffy Cornbread mix in the pantry seemed like a good idea to make. Each box only yields 6-8 muffins. That didn't seem like a proper offering. I looked around at variations for the mix and also additions and found some good recipes. One I followed loosely.
I saw some recipes adding corn. The recipe I liked called for creamed corn and I didn't have any. I did have frozen corn. After perusing creamed corn recipes, I liked this one.
I ended up making a half recipe of creamed corn with 8 ounces of frozen corn. Using 3/4 cup of milk instead of a full cup would have probably been perfect. As I made it, I ended up draining off some of the liquid.
My recipe ended up like this:
2 eggs
1/4 cup milk
6oz plain Greek yogurt
2 boxes of Jiffy mix 8.5oz

Creamed corn: 1/2 bag 16 oz frozen corn cooked, 1.5 TB butter, 1.5TB flour, 1 cup milk, 1.5 Tb sugar, pepper (drained some liquid off)
1 cup shredded Mexican blend cheese
This yielded 11 regular sized muffins and 24 mini muffins. The muffins were very moist and got nice reviews from my kids. I liked them better than the plain mix because they texture was less gritty.
![]() |
| Cornbread Muffins |
I ended up making a half recipe of creamed corn with 8 ounces of frozen corn. Using 3/4 cup of milk instead of a full cup would have probably been perfect. As I made it, I ended up draining off some of the liquid.
My recipe ended up like this:
2 eggs
1/4 cup milk
6oz plain Greek yogurt
2 boxes of Jiffy mix 8.5oz

Creamed corn: 1/2 bag 16 oz frozen corn cooked, 1.5 TB butter, 1.5TB flour, 1 cup milk, 1.5 Tb sugar, pepper (drained some liquid off)
1 cup shredded Mexican blend cheese
This yielded 11 regular sized muffins and 24 mini muffins. The muffins were very moist and got nice reviews from my kids. I liked them better than the plain mix because they texture was less gritty.
Friday, February 8, 2013
Girl Scout Quilts Completed
Finishing the two Girl Scout quilting projects coincided with me purchasing a used HQ 16 sit down mid arm quilting machine. This gave me extra motivation to complete the parts and get to quilting. Beginning with the pink ribbon quilt, I finished putting the rows together. There were a couple squares put together where the seam allowances were too big and the row was too short. I did end up ripping out them and resewing. For the most part, it went together fine. Another step I needed to do that I don't usually need to do was to square up the quilt front. The edges were just not straight. A three inch striped border pulled it all together.

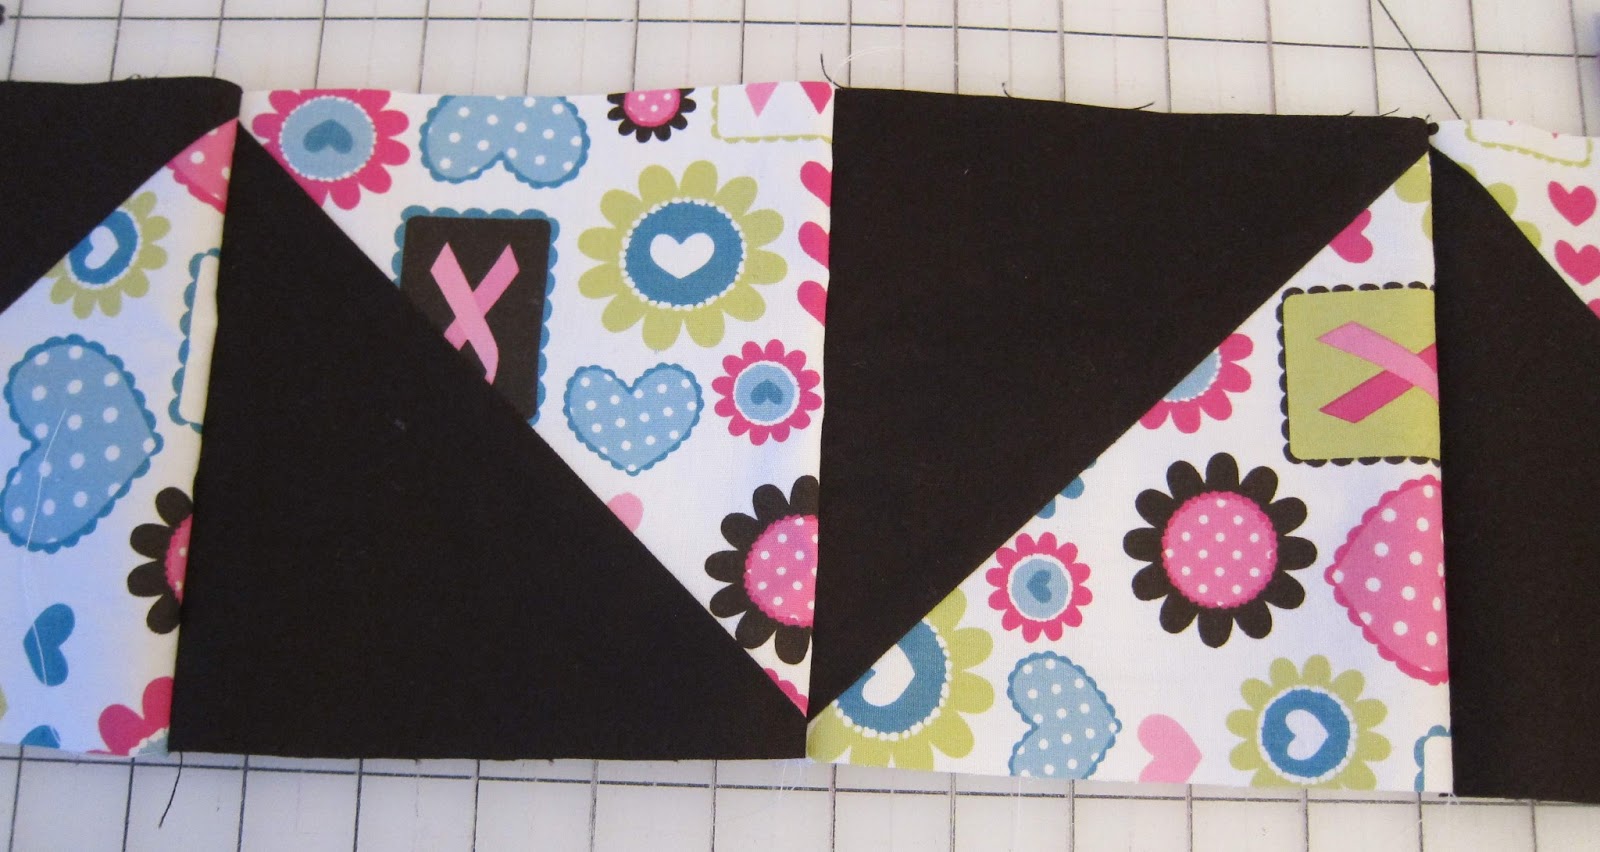
For the back, I had purchased striped fabric and knew I would need to piece the back. After measuring, I figured I wasn't too short and adding a column of leftover squares would make up the difference. Pink ribbon and brown squares were mostly what was left. Because I don't usually follow quilting patterns, there are many shortcuts I haven't learned yet. In researching quilt ideas for the "Blip on the Radar" quilt, I found a triangle trick using squares. It worked out well and went together quickly. ![]() |
| Back of the Pink Ribbon Quilt |
The blue quilt had additional problems. This group didn't always sew the squares together all the way to the end. As I sewed the rows together I had to fix some of the seams. After some consideration, I decided not to add a border to this quilt, but to add an additional row and column of squares. This seemed to work better. The paisley fabric had been give to me at some point. I don't even recall where it came from, but is a nice wide fabric and I had a lot of it. It worked well for the back without needing to be pieced.
For the blue quilt, I considered trying a different quilting pattern for the stitching. A paisley pattern would have matched the quilt well, but I was concerned about committing to the whole quilt and having it take too long.
Because I needed a new thread color for the blue quilt, I tried out some Gutermann I had on hand and could not get the tension right for the HQ 16. Finally I bought some new thread designed for machine quilting and it made all the difference! It was a Coats and Clark variegated blue. It was new to me using a variegated thread and I liked the effect. Typically I hand sew the bindings on and after considering ways to machine sew it on, decided to go with hand sewing. It is a longer process, but fairly mindless and can be done outside of my sewing room.
I look forward to bringing the completed quilts to our next Girl Scout meeting and showing the girls how a bunch of squares they sewed together can transform into a beautiful quilt. The next stop for these quilts will be to be donated to the Breast Cancer Coalition of Rochester. They will be offered to newly diagnosed women.
Subscribe to:
Posts (Atom)