Sunday, February 16, 2014

Mexican Rice Dish


It has been years since I made this recipe.  It yields a lot of food and usually goes over well.  It's pretty easy to put together, though I dirtied three pans and two casserole dishes.  Also, I am realizing the ratios may not be perfect.

Rice and Corn Mixture:
2 cups of brown rice cooked in vegetable broth - I made up 4 servings which yielded a bit more than 2 cups, used it all
1 3/4 cup corn made into creamed corn 
2 TB butter, 2 TB flour 1.5 cups of milk, 2 TB sugar, pepper
Additional 2 cups of frozen corn

Black Bean Mixture:
About a cup of peppers and onion mixture frozen, then diced, Sauteed in olive oil
Add big can of black beans 25oz, 2 cans of diced tomatoes
Small can of jalapeños 
1 TB cumin
1 cup fresh salsa
2 8oz packages of Neufchâtel cream cheese
Mix all together until cheese is melted

Layer bean mixture, rice/corn mixture, shredded cheddar, bean mixture, rice/corn mixture, shredded cheddar.

Filled one 3 quart oval dish and had lots of extra bean mixture, only 3/4 cup rice/corn mixture left. Ended up having one small dish of bean/salsa/cheese mixture for dipping and the larger casserole with rice and corn.

This is great with corn chips or just eaten with a spoon.  The leftovers we had in tacos with ground turkey.

Bake at 375 degrees for 20 mins

Gluten Free Cake Balls

For Valentine's week, I had thought I might make some cake balls for the teachers at my daughter's school.  Instead I had a sick kid and others signed up first.

On the weekend was a pot luck sledding party.  Cake balls it was!  I learned that a gluten free option might be welcome.  After perusing the cake mixes at Wegmans, I went with Glutino's Decadent Chocolate Cake.  The recipe itself called for yogurt as one of the add ins, my kind of recipe.  It also called for butter, eggs and vanilla.  I decided to use coconut oil instead of butter.

The cake came out nicely, but seemed a bit drier than what I usually do.

After the cake cooled, I crumbled it up into a bowl and added softened Neufchatel style low fat cream cheese.  I added a bit at a time and ended up with probably 6oz of the 8oz bar.

While rolling the cake balls, I noted they didn't seem as smooth as usual either.  After putting them in the freezer while the chocolate wafers melted, I dipped each in the chocolate.  They appeared a bit smoother.  Drizzling another color on top always gives such a nice presentation and hides many imperfections.  The pink seemed a little thick, so I added some of the leftover white wafers which helped.

Even though this mix yielded a square 8"x8" cake, it still make tons of cake balls!  I didn't count, but it was more than I expected from a smaller pan, I may have rolled slightly smaller balls too.


Monday, February 10, 2014

Chocolate Cut Outs & Valentines

The little one and I have recently joined a playgroup. Being almost four apparently means wanting to play with other children and socialize more.

With Valentine's Day approaching, I suggested having a little party complete with a Valentine exchange and decorating cookies. Another mom offered to make cookies also.  I had sought out a chocolate cut out recipe to try.  I'm not a big fan of sugar cookies, but hoped a chocolate version would be better. 


The recipe sounded easy enough and came out well. My family seems to like them. I think adding frosting will improve the taste further. My husband suggested they taste like the outside of a chocolate poptart. 

We found some really cute Valentine sprinkles at Wegmans.  We will do buttercream frosting and sprinkles for the kids. I may frost some with royal icing if there are cookies leftover.

For the Valentine's, I found an example on Google images of using a thumb print monkey with the words, "I like hanging out with you!"  Perfect for playgroup friends!  Kessa decorated the back with stickers and used her new "Kessa" custom rubber stamp.


Sunday, February 2, 2014

Sawtoothed Star and Colonial Days

The fourth graders have a Colonial Day at school and parents volunteer to help kids experience what life might have been like.  There were many different sessions for kids to chose from. They could make butter, create and play colonial games, do stenciling, tin punching, doll making, and my session on quilting.

A star block was not something I had made before. I had a mini quilt with wonky star blocks to show, but I also wanted to show a traditional saw toothed star block. I found a tutorial with a trick to make four flying geese at once.  


I had offered a quilting session when my first child had been a fourth grader and learned some interesting things along the way. First of all, quilting was not really done very much initially. Life was too hard to have time to quilt. When quilting was being done, it was more of whole cloth quilts, applique quilting, and then Medallion quilts. I shared information about each of these styles and provided 6" square quilt sandwiches for each student. 

In doing my research I also learned about some typical sewing projects from that time.  Most girls did an alphabet sampler.  Another interesting thing I came across was the pocket.  Pockets were not sewn into women's garments.  A pocket was made and tied around the waist.  It was accessible through an opening in the woman's skirts side seams.

Both times I did this, I provided examples and the kids seemed to enjoy coming up with something to applique to their quilt sandwich.


 It was interesting that many kids this year appliqued their initials.  Maybe they were thinking about the alphabet samplers.


Sunday, January 26, 2014

Fabric Mailbox and More Postcards

My daughters love the fabric postcards I've been making.  I toyed with the idea of making a fabric mailbox, but wasn't sure.


This week, my younger daughter requested a snowman postcard.  It came out so cute, I made a few more.  Now that my daughter had two of her very own postcards, I decided to try out a fabric mailbox.


I found a couple tutorials I liked.  I loosely followed this mailbox tutorial.  I had seen another tutorial that used a button for the flag and velcro at the door and liked those features.  

Fortunately I had the plastic canvas at home already as I hoped to make a fabric dollhouse at some point.  I determined the size by taking one of my 4"x6" postcards and making it a bit bigger.  Then, I shaped a mailbox shape and, along with a helper, traced the shape onto paper.  This became the front and back flaps.  Then I used the width of the flaps for the bottom piece.  

I laid everything out together with small spaces between the plastic and cut out some fabric.  I added thin craft batting to the outside layer of fabric.  The inside is felt.  I forgot to add the velcro to the top of the mailbox when I was sewing everything together.  It worked out fine to rip out a few stitches and insert it in.  That made it easy to get the right placement.

For the flag, I just cut some felt about the right size (2 layers) and then cut some plastic canvas a bit smaller.  I did a zigzag stitch around the outside.  For the button, I just cut a small slit in the flag through all the layers.  Then when I sewed the button on, I was careful to have every stitch go through the slit.  It was a little tricky, but made for nice stiff flag.
My girls love the mailbox and another has been requested.  We will see.


Friday, January 17, 2014

Sachertorte for German Class

My thirteen year old son came home with a recipe for Sachertorte. Even after studying German myself for many years complete with two trips to Germany, I had never had Sachertorte. I guess had I visited Austria, I would have definitely tried Sachertorte.

The recipe looked tricky with many different parts.  The teacher had included a link to the recipe on Epicurious. 

 The number of ingredients wasn't too many, it was just the method of adding them together that was very specific. 

I did need a few ingredients that I didn't have on hand:  high quality bittersweet chocolate and apricot preserves. In addition, I also did not have a springform pan or a candy thermometer. 

I learned we had a week before the cake was due in class for a cake baking competition. I read through the recipe many times and looked at some of the reviews. Someone recommended watching the accompanying videos to really understand the steps. The day we planned to make the cake, I watched the videos. They were helpful and even a little different than the written instructions, especially for the chocolate glaze. 

The first step was to take the butter and eggs out and bring them to room temperature. After dinner, we started on the cake. I wasn't sure if we would have time to also make the glazes or not. We melted chocolate with a large bowl on top of a pot of hot water, separated the six eggs and got out the standing mixer. The directions were very clear at that point and familiar. Everything seemed to go well. As the videos states, I added everything slowly and mixed in between.  I used the butter wrapper to grease the springform pan, placed the batter in and finally baked in the 400 degree preheated oven.  I set the timer for 45 minutes and waited. We peeked in a few times through the window and I did check it with 3 minutes to go. But a few places on the bottom and sides did get too dark. In the video, the chef suggests a 375 degree oven and I wonder if that would be better. Or checking it sooner. 

The cake came out of the springform easily and because it is a dense cake, it is easy to handle and flip over with cooling racks. It didn't take too long to cool and before long I was separating the tall cake into two layers. I followed the video's suggestions for separating the cake scoring first and then cutting and turning the cake.  I used a serrated bread knife. Handling the layers was easy too. I didn't feel they would crack or fall apart. I decided to try to trim off the dark areas and that was easy too. I just went slowly and used my sharp, serrated knife. 

It looked like we still had time to make the glazes. We cooked up the apricot preserves with 2 TB of water. Spreading it on was easy. I didn't strain the solids like the recipe states, as it hadn't been explained in the video. I think we would have had less bumps on the final layer if we had been more careful about a smooth apricot glaze layer. 

As that cooled, we made the chocolate glaze. We followed the videos instructions for boiling the sugar and water first and adding the chocolate at the end. I'm not sure it ever got as warm as 234 degrees, but the sugar water mixture did start to make a small strand between my son's fingers, and after adding the chocolate, we did see it getting shiny. 

Slowly pouring the chocolate glaze on worked well to cover every inch of the cake. All the drippings on the parchment we did collect for making hot chocolate. It was recommended a small amount of glaze heated along with milk makes a nice hot chocolate. 

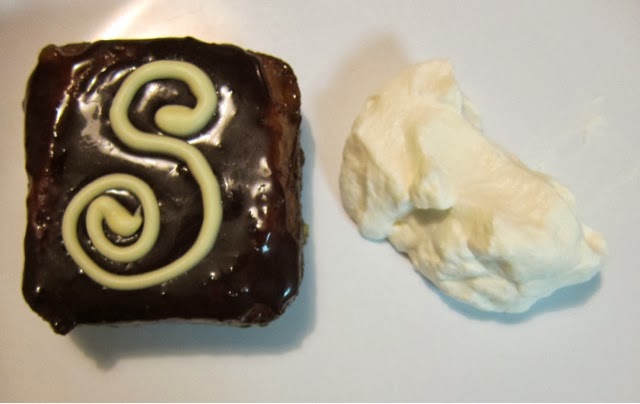
Finally we added white chocolate piping for decoration. 

Now we wait, the whole cake is going to school for the competition and extra credit. Hopefully we will be able to try it at some point, or we may need to try it ourselves!

The next day...
After getting nice comments and strong positive memories of Sachertorte, it seems wrong that I hadn't had the chance to taste it. Also, one local friend sounded like she might like to have some too. I knew doing the recipe again would go quicker. Also, I had purchased a set of three mini springform pans which would be fun to use. That would make it easier for giving one away as well.  
Making everything again did go quicker. A couple different things happened too. First when separating the eggs, the smallest amount of yolk got mixed in accidentally. I hoped it would be ok.  Unfortunately, the egg whites just got white and bubbly, they never became meringue.  I needed four more eggs to try again, fortunately a neighbor could help us out. Second try with the egg whites yielded perfect meringue.
I purchased a different apricot preserve which had less solids and better ingredients. I had missed it my first trip to the store.  
When I was making the chocolate glaze the second time, I think I was more patient after adding in the chocolate and allowed the mixture to get back up to temperature.  This batch of glaze seems even shinier and no cracks. 
Working with the smaller cakes was easier too. They cooled faster and I could cut by turning the cake on its side.  Because the chocolate glaze had gotten hotter, I don't think I allowed it to cool enough before pouring it on the cakes. I ended up needing to spoon some glaze back on the cakes from the waxed paper. 

Along with the three mini springforms, I made five tiny square cakes.  If I had more mini springform pans, I might have filled one or two more. I baked them about 27 minutes at 375 degrees. The tiny squares got a little too dry on some edges. The mini springforms seem perfect.

We made up some whipped cream for dipping and tested the minis, they have a nice flavor.


I did get a slice of the first big cake after traveling around school and it was pretty good.  I bet it is slightly overcooked, but not too bad.


The mini springform cakes were delicious!  I think they were baked perfectly.  The topping was better too.
 

Sunday, January 12, 2014

Fabric Postcards

At my local Modern Quilt Guild meeting, I learned about fabric postcards.  Back in 2010 when I had my third baby, I actually received a fabric postcard from a friend and was quite impressed with it.  The details, the ability to travel in the mail and the cute factor stood out to me.

I never really considered making my own fabric postcards until at our meeting we decided to draw names and make and send one postcard out for Valentine's Day.  Once I got started with making the one, I didn't want to stop.  They are fun to make and due to their size, a small canvas for trying new things.

For this project, I did purchase Peltex, a stiff interfacing, and a postcard rubber stamp.  Both items I found at Hobby Lobby.  The Peltex they had is fusible on both sides.  I read later that this might be a disadvantage, but it seemed to work well for me.
I did a combination of sewing parts together and also just layering fabrics.  Then after fusing the top layer to the Peltex, I quilted on top to hold everything together.  Finding ribbons and small scraps of fabrics for embellishments was fun too.

After completing the top and quilting, I cut a piece of white fabric and fused it to the back of the postcard.  If I didn't iron too long on the front, the fusible back didn't seem to get activated until I ironed on the back.  Once all the layers were together, I did a satin stitch around the outside once more slowly and a second time faster.  Then using my new rubber stamp, I stamped "Postcard" on the back.

I have read different things about how to mail these.  First class postage seems to work ok, hand stamping at the post office is often recommended.  Some use thin cello bags to protect the mini quilts during shipping.  Because I didn't use any beads or sequins, I think sending them alone may be fine.  Hopefully they will all reach their destinations!