Sunday, July 29, 2012

Homebirth Picnic Cookies

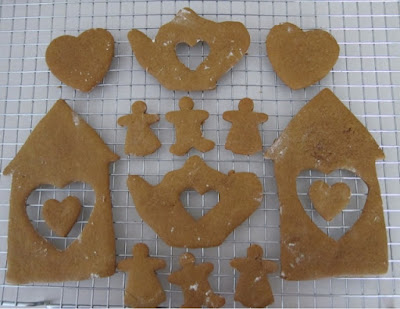
cut out cookies house, heart, tea potThere was to be a picnic for families who have had homebirths today. It was pot luck. I personally am not a big fan of pot luck...maybe because I don't usually get lucky at such events. ;) I have a couple things I like to bring, either fruit salad or pasta salad. I wasn't too excited about purchasing needed items or the cutting involved with either option.

I had been informed we had bananas that needed to either go in muffins or were headed to the trash,  Muffins it was. I thought the muffins would be an acceptable picnic offering, except that my family loves these muffins and would prefer to eat them all instead of saving them for the picnic.

Then I got an idea. As often happens with these things, I get an idea and want to run with it, whether I have the necessary items or not. I thought I could make gingerbread cut out cookies and maybe somehow cut them in house shapes with hearts in the center. I did a quick search and found that what I imagined exists in a cutter made by Ann Clark. I remembered that Ann Clark cookie cutters are sold at my local grocery store and I needed molasses for my cookies anyway.

I was excited to find the cookie cutter display, but they did not have the cutter I wanted. I considered just getting something else and also using what I had at home. Then I recalled the cookie cutter making kit I had from last year and decided I could maybe convert a cutter into a house. I knew I had a number of heart cutters already. I purchased a crown hoping to convert it into a house and a tea pot because it was cute.

Once home, along with my husband's help, we converted the crown into a house. The cutters are a heavier duty metal than the metal from the kit so it was a bit harder to reshape the cookie cutter, but it worked well enough.  The house ended up being pretty big and would probably be even better a touch smaller.

I made the cookie dough and let it sit overnight.

In the morning along with my girls' help, we made houses with hearts, tea pots with hearts (Sydney's idea), little girls and boys, and lots of hearts.

The gingerbread recipe is so easy and always comes out great. It's a soft cookie due to the shortening I'm sure. It comes from the Motherhood and Apple Pie cookbook.

The cookies were well received. I'll have to keep them in mind for another picnic.

Monday, July 23, 2012

Indoor S'mores

A week or so ago I saw the Moody Fashionista's post about S'more pops. I hadn't heard of making S'mores this way.  Had I had any graham crackers, I would have been trying something similar that day.  Then I did a little search and found lots of creative people are mixing graham crackers, chocolate, and marshmallows together in different ways.  Another recipe that looked worth trying was one for Magic S'mores Bars.  But ultimately the one I loosely followed was a recipe for Chocolate Covered S'more Pops 

I still needed graham crackers and while I was at the store, I figured I'd simplify things further by using Fluff.

I started with the graham crackers, spread Fluff on one side, sandwiched them and finally dipped them in melted chocolate chips.

While I was working, some graham crackers broke not on the lines.  I took a little chocolate one one side and Fluff on the other and I was eating a S'more!

The extra chocolatey outside is good, but the back to basic S'mores made with melted chocolate and Fluff was just right.  I bet it could be further simplified with Nutella on one side and Fluff on the other. :)

While I am a camper and do enjoy a properly toasted marshmallow squished between Hershey's chocolate and graham cracker, I can still appreciate an indoor S'more alternative.

Wednesday, June 27, 2012

Wonky Baby Quilt

After playing around with improvisational quilting and wonky quilting, I was inspired to try a whole quilt for my cousin. She is expecting her first baby soon.

Once again, I tried to pick fabric prints that have some relevancy to her life. I even included a print that reminds me of our grandmother. Some of the prints are just fun or have nice coordinating colors.

While searching for more examples of the wonky style of quilting, I found this blog post utilizing the stack and whack method of cutting. I was intrigued.

I had been collecting fabric for this quilt for a while now and had a few fat quarters, some pieces that were just over 1/4 yard and two prints I had ordered that were 1/2 yard each.  The white artist print I created with rubber stamps and permanent ink.

According to the tutorial I found, the size suggestion was to start with a 15 1/2" square. Some of my fabric wasn't big enough. Instead of totally abandoning the concept, I decided to take a remnant that was big enough, do some random cuts per the tutorial, and then use the remnant fabric as a pattern. It worked very well. I just needed to keep track of each pattern piece carefully and always put the whole thing back together like a puzzle.  I grouped the fabrics into three groups. The four different prints in each group would make up four different blocks with three prints in each.  No two would be alike.


Next I laid out all the blocks on the floor to decide where each would go.  After trying a few combinations, I took some pictures and even got some other opinions.  It's an interesting process keeping the same fabrics far enough away from each other and still liking the ones next to each other.

After completing each block, the directions suggest using a 12.5" square to square up each block.  That went well and did take off 1/2" or so off each side.  I was able to angle my square a little to enhance the wonkiness.

Once the placement was decided, sewing the blocks together was a breeze.  I hadn't purchased any border or backing fabric, so it was off to the store.  I found a few I liked but finally decided on a black with stripes and polka dots.  I passed by it a few times at the store and liked it every time.  I often like to avoid stripes, but the stripes are really cute especially for baby quilts.

The quilt was measuring about 37" by 49".  I figured adding a 3.5" border would work well.  Unfortunately that made the total quilt bigger than a typical width of fabric.  That means my back would be pieced.  But I like the idea of using small rectangles of the fabrics used on the back.  I took a 3.5" by 4" square of each fabric and sewed them together in a row.  Then I calculated how much fabric I'd need to make up the roughly 60" by 46" I should have for quilting.


Batting was also on my list.  I found a 60" by 60" packaged batting that would  be perfect.  It's a mix of organic cotton and bamboo.  It was very nice to work with and seemed to quilt up well.

The final steps were binding and adding a quilt label.  For binding I cut 3" strips, folded the long way and sewed it around.  To finish the binding, I hand sewed the folded edge to the back.


Wonky baby quilt
Finished Wonky Baby Quilt
Close up of one block
 I'm very happy with how everything came together.  It's always hard to know at the beginning stages if I'll like the fabrics together.  The quilting is always a gamble for me too.  I make decisions along the way, but once I start on one section, I feel a need to keep it going for the whole quilt.  I did free motion squiggles on each center square and outlined the two borders on each block.

Thursday, June 7, 2012

Old Goretex Jacket Repurposed

My 12 year old broke his hand yesterday...I will probably never understand boys. Anyway, because the bone needed setting, the cast is not waterproof.

Five years ago my parents were in a bizarre accident and ultimately much of their clothing was cut in order to treat them. One item was my mom's Goretex jacket. I couldn't bear to throw out such nice fabric.

I've used parts of the jacket for other projects. One was to have a "jacket" for my mom's exposed broken leg and external fixator five years ago.

I looked and found the remaining fabric. I had the hood and one cut sleeve. I thought the sleeve would work well. The Velcro part at the bottom of the cuff worked for around my son's upper arm, then I decided to use more Velcro to insure it could go on easily. The rest I sewed up and around and then folded the seam over and sewed again. Hopefully this will make the seam waterproof enough.
waterproof cast cover protector
Goretex Cast Cover
This was one of my favorite kind of projects. It fulfills a need, uses fabric I have around, and took less than 30 minutes! I realize we could go the plastic bag route, but I hoped with this waterproof cast cover, my son could be fairly self sufficient. And I do enjoy a quick project.


We had a weekend planned at a hotel with a pool.  I knew the Gortex cover wouldn't be ideal for actual swimming and found a cast cover by DryPro.   It creates a vacuum around the cast preventing water from coming in.  Because of the rubbery material, it's important to keep sharp things away.  The fiberglass cast isn't very smooth, but I had read using a sock with the end cut open is a good layer.  We tried out that method at the pool.  It worked pretty well but did get some water in at the top opening at the arm.  It got the cast a little wet, but not the part around the actual break.  The second swim time we opened, checked, and revacuumed the sleeve regularly.  I think the final improvement would be to use a wool sock to help repel the water more.  Using cotton just kept any moisture that got in close to the cast.  I should mention too that he was swimming, pushing off the sides, and going underwater.  For someone just floating around and playing gently in the water, they might not need to check the cover as much.


Goretex cast cover at the beach
DryPro waterproof cast cover for swimming
Our weekend also included time at a beach.  The Goretex sleeve was perfect for playing in the sand with the occasional water play. It kept the sand out of the cast and kept it dry.  After all the covering and sock use this weekend, my son had the idea to just wear a cut sock on his cast while playing outside too.  It would just keep the cast cleaner.  Now we have the perfect use for all those unmatched socks!

Monday, May 28, 2012

Giant Hula Hoops

At one of the places I teach my hoop fitness classes, the owner requested a giant hula hoop. Once when I was making a regular sized hoop, there was a bit extra tubing left on the roll, so I made an extra big hoop. It ended up being about five foot diameter. Though when I showed it to the owner, it was not big enough to be giant.

I did a little research to see how big a hoop I could make and how big is good for hooping. I found the Guinness Book of World Record for the biggest hula hoop. It works out to be about a 16.5 foot diameter. I asked fellow hoopers and searched the internet.

I noticed that the world record hoop looked very hard to use. I found a video of a man using a 10 foot hoop on an elevated tower. He made it look effortless.


Other materials might be better and certainly a nice lightweight aluminum might be perfect, but I decided to go with what was available to me locally. I got 1" tubing with a rating of 100psi. It is not the most rigid tubing, but this also makes it not too heavy.

I decided to start with a ten foot diameter hoop. I spun myself and the hoop a bit and right away the hoop started to bend near the connector. The next try was with a nine foot diameter hoop. It was hoopable, but big and heavy. I decided it would not be a good option. Next was an eight foot diameter hoop. It worked pretty well. Before I cut it down, my daughter took some video of the nine foot hoop and then both of us trying out the eight foot hoop


Mini hoops all the way to an 8' hoop!
The next day I decided to make a seven foot hoop as a second option. It was a bit easier to use.

Before assembling the hoops, my husband had helped me sand down one end of the connectors. This allowed me to easily pull out the one end of the hoop making it collapse easily. Eventually I planned to add a push button connector. In the mean time I just taped the seam together to prevent the hoop from coming apart at the wrong time.

I brought my "naked" temporarily taped together giant hoops to the gym. The owner liked them both! The next steps were to put on the requested sparkle tape and install the button connector. The hoops needed a bit less tape than I had anticipated, which was a nice surprise. I used all of one roll plus some a second roll of 25' roll of sparkle tape and some additional gaffer tape.

Hooping with a seven foot hoop!
I hope everyone who gets to try them will enjoy the giant hoops for a long time! So far they have brought smiles to all the people I have seen try them!

Sunday, April 29, 2012

Marble Runs

When I was a girl, I loved playing with a wooden marble run that I always remember having. It actually still resides at my parents' house and I continue to enjoy it along with my children.

Over the years, we have purchased or received a variety of marble runs as gifts. We had a build your own plastic one, an expensive interchangeable wooden one, and a couple toddler versions that used balls.

While the concept of a changeable marble run is nice, it always seemed to get knocked down or fall down before we were done playing with it.

The wooden ones are the most appealing to me and they seem to be the most expensive.

This Christmas I hoped we could get one like my parents', but maybe with the improvement of double racing rails. I found a couple varieties, mostly Amish. Again, cost determined that I should wait a little longer.

My husband wondered if he could build one for us, but time got away again.

In the mean time, I thought I could find some molding that might work for us. I wondered too of it could later be incorporated into a constructed marble run.

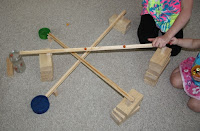
I took two marbles and my two girls to Lowes. We checked out the molding options and found one that allowed the marbles to run nicely.

After returning home with my 96" piece of molding, we talked about options for cutting it. We decided on thirds, one for each kid.

blocks, marblesThe bottom of the molding is a little too rounded and tippy for setting on a flat surface. But looking through our blocks, we found some little "U" shaped blocks that hold the molding very well.

My $7 molding has been a great purchase so far and provided hours of play in the two days we've had it.

Maybe for my birthday I can have a two rail wooden marble run...I'll make it my wish. :)

Mastectomy Pocket Pattern for Athletic Top

About five years ago I went through breast cancer treatment including a single mastectomy and reconstruction.

Perhaps the reconstruction was always a little uneven, but time and transformations due to pregnancy and breastfeeding have given me an unmatched set. It was when I was halfway through my post breast cancer pregnancy in 2010 that I really noticed a difference. I took a trip to Thelma's and the lovely ladies there found me an enhancement and a mastectomy bra which has pockets for such enhancements.

As I neared my due date, I realized that bra shopping might never be the same for me. And what exactly is the demand for a nursing, mastectomy bra? Probably just me and maybe a handful others.

I had a few old nursing bras that I was able to sew pockets in for my enhancement. Another trip to Thelma's yielded a stretchy bra that would work for both purposes too.

Hidden Mastectomy pocket inside
Now that I am teaching hooping exercise classes, I find myself wearing an athletic tank top. I started out just wearing my regular bra underneath. That worked pretty well, but I didn't always like my old, worn bra strap peeking out.

There were many times when I would think about what options might work. I considered a new bra, a mastectomy tank top, and adding a pocket myself. On the one hand I didn't want to ruin my tank top. Also, stretchy material is notoriously less friendly for sewing. But I did remember a hot pink four way stretch material I had from long ago that would work quite well.

Finally during a trip to Target, I noticed the athletic tanks were on sale and there were new colors. I decided on purple. I think the fact that I had two now made the decision to mess with one of them easier.

I found that hot pink stretchy material surprisingly easily. And my crude pattern from when I adapted the nursing bras was located as well.

I marked the center of the tank top and used rolled scotch tape to hold the pocket in place. My first attempt was with a wiggly toddler in my lap, but it worked and the stitching is not visible from the outside.

Attempt number two was slightly more aesthetically pleasing, but not too much. I'm delighted with my altered tank tops. They look great from the outside and allow me to leave my old bra home.

Adding a mastectomy pocket is much easier than my brain leads me to believe. Probably the best tips are to use a stretchy material, allow the "pocket" to be pretty generous following the contours of the bra or top, to leave two openings to allow easy access to the pocket for insertion and adjustments, and to remember that the stitching won't show and doesn't have to be perfect.  :)