Thursday, May 30, 2013

Breakfast Cookies

On a whim I made chocolate chips cookies one night.  The short version is that the boy ate all the home baked goodies we had and the sisters had none, even after he was asked to leave some for the girls.  So we made chocolate chip cookies and because the double chocolate chips were still gooey at bedtime I left them out.  I figured that the boy would likely snag one in the morning.  He doesn't normally leave time for breakfast, but I wondered if a breakfast cookie sitting on the table might be a nice breakfast for him.
banana, coconut oil, chocolate chips, healthy
I searched around for breakfast cookie recipes.  Many have very few ingredients and seem to be more like a blob of oatmeal.  I wanted something a bit more cookie like with some flour, an egg, maybe a touch of oil and sweetness.

I found one recipe I liked, but did make my own adaptations.  I think the result is tasty and moist.  Many recipes had some almonds or almond flour in them and that seemed like a good idea for protein.  The almond flavor is certainly present along with the banana and chocolate chips.

Somehow I lived my whole life without using a cookie scoop until now.  I actually thought I wouldn't need one.  My perspective has changed completely.  Using the scoop saves time, allows you to scoop and drop the cookie and keep your hands completely clean.  It is a very good idea.

Breakfast Cookie Ingredients:
1/2 cup chopped dates
1 ripe banana
1 large egg
1/4 cup coconut oil
1 1/2 TBSP agave nectar
1 tsp vanilla

1/2 cup whole wheat flour
1/2 cup ground flax seeds
1/2 cup raw almonds (blend into flour/meal)
1 cup oats
1/3 cup unsweetened shredded coconut
1 tsp baking soda
1/2 tsp cinnamon
1/2 tsp salt

1/4 cup mini chocolate chips

Directions:
Blend raw almonds into almond meal/flour.  Remove from blender.  Blend chopped dates a bit, then add banana and blend some more.

In a large bowl, mix date and banana mixture with egg, melted coconut oil, agave nectar and vanilla.

Breakfast Cookie Batter
Add dry ingredients:  whole wheat flour, ground flax seeds, almond flour, oats, shredded coconut, baking soda, cinnamon and salt.

When well incorporated, fold in mini chocolate chips.

Drop by teaspoonfuls onto lined baking sheets, flattening down a bit with a fork.  Bake at 350 degrees for 10-12 minutes until just golden on the edges.  Yields 36 cookies.


Breakfast cookie balls
Breakfast cookies flatted with a fork
.

Wednesday, May 29, 2013

Girl Scout Luau Party

I looked around for cookie recipes for a the end of year Girl Scout ceremony and party.  Coconut and Lemon cookies were suggested.  I didn't know any recipes like that.

A Rice Krispie Coconut ball recipe sounded interesting.  There are dates for sweetness, but also plenty of butter.  Most everything is melted on the stove and then the Rice Krispies are added and rolled into coconut.  They are ok, not a new favorite.

This lemon cookies recipe sounded promising as well.  Very lemony and easy to make.  Not my family's favorite either.  We are more chocolate people.

Sunday, May 19, 2013

A Girl Scout Quilt Story

Our Brownie Girl Scout Troop was doing the journey A World of Girls.  In it we talk about how stories are a big part of our world and how they can be told in different ways.  One way is through a quilt.  It was suggested that each girl think of her strength and depict it on a quilt square.  Then together the squares tell the story of the girls in our troop.

Of course this was a project that resonated with me.  I gave each girl a 7" square of muslin, showed some examples and gave them felt and fabric markers to use.  I loved their ideas and how they brought the ideas to fabric.  I told the girls that I would put the squares together for our end of year ceremony and then they could take them home afterwards.

I added a second 7" square of muslin to the backs with serging, then basted the squares on a bigger piece of fabric.  I intend to separate the squares after showing them off at our ceremony.


11 Minnie Mouse Birthday Shirt

I was asked to make a birthday shirt for a soon to be 11 year old. She will be visiting Disney World for her birthday, how cool is that?


Saturday, May 18, 2013

Chocolate Granola

Chocolate Lover's Granola
We ended up trying some Bear Naked Heavenly Chocolate Granola because we earned a coupon from Stoneyfield Yogurt. It is quite tasty!  My son and husband enjoyed it with milk. I mixed it in with black cherry Greek yogurt and it has become my new favorite lunch!  After going through the free package quickly and purchasing a second. I wondered if I could make something similar.

There are many granola recipes out there. It's really a basic concept. Because I wanted to make something like the Heavenly Chocolate Granola, I started with similar ingredients.  After checking out a few recipes, I figured I was ready to try to make some. My first attempt wasn't perfect. I kept baking the granola waiting for it to get crunchy and it never did. Also I had baked the chocolate chips and they tasted a bit burned. 

Try number two was destined to be better and it is better. So much better it's worth writing down and blogging about.  I intended to just use unsweetened cocoa, but ran out. I used about 3TB plus 1 oz of melted unsweetened chocolate.  Using some unsweetened chocolate does add a bit more fat, but the taste shouldn't be much different. (5/24/13) I have made this with just cocoa too and it's all good.

Chocolate Granola Recipe
Mix together
3 cups oats
1/2 cup Rice Krispies
1/2 cup ground flax seeds
1/2 cup unsweetened shredded coconut
1/3 cup unsweetened cocoa

In a saucepan melt and mix
1/3 cup coconut oil (can decrease to 1/4 cup*)
1/3 cup honey (can decrease to 1/4 cup)
1/4 cup packed brown sugar (can decrease to 2 TBSP)
A touch of vanilla

Add melted ingredients to oat mixture and combine.


Spread out on pan. I have a Pampered Chef baking stone which worked well. Many people recommend using a silicone sheet or parchment. 

Bake at 350 degrees for 30 minutes giving a stir after 15 minutes. 
Remove from oven and add 1/2 chocolate chips, chips will melt as they are stirred in. Flatten down the baked granola and allow to cool and harden. Small bunches will form from the melted chocolate and also with the cooling. Once cool, store in an airtight container. 
*Decreased fats and sugars still tastes great!  Yields 6.5 cups, serving size 1/4 cup.  Nutritional Info for lower fat and lower sugar recipe.


Thursday, May 9, 2013

Minnie Mouse Dress

My daughter saw a child wearing a Minnie Mouse dress at the library and couldn't stop talking about it.  I don't think she knew such a thing existed and now that she knew, she really wanted one.

I informed her that we actually have one at home that belongs to her sister.

Once at home, it was clear that the dress my older daughter had worn at age six would be much too big.  I offered to look around at my fabric stash.  I knew I had some leftover red with white polka dots from other Disney inspired projects, I just wasn't sure how much.

Small amount of red with big polka dots and small amounts of red with small polka dots were all I found.  I wasn't sure what we could make.  The girl at the library's dress had a red polka dot skirt with a black bodice and white tulle sleeves and trim.  My older daughter's has a red bodice, red polka dot sleeves and skirt.  Fortunately I did have plenty of both red and black stretch crushed velour.

While I was taking inventory of all the scraps, my daughter decided on a red bodice with the larger polka dot print.

This was a special challenge.  I was able to get just enough fullness for a skirt out of three separate scraps pieced together.  The length of the skirt was determined by the material available.  For the sleeves, I wasn't sure I could find enough at all.  But after piecing two pieces for each sleeve, I hoped I had enough for a sleeve.  Also, the width was determined by the available pieces.

I used an existing dress as a pattern for the bodice and everything else was just using the fabric available.  Most of the dress was put together after my daughter took a nap.  This is good and not so good.  I finished the dress while she was sleeping, but then realized that the bodice was much too big and the sleeves needed help too.  I ended up changing things a bit, adding elastic to the sleeves and taking in the bodice.

Wednesday, May 8, 2013

To Boston with Love

Another cool project that the Vancouver Modern Quilt Guild spearheaded is Flags for Boston.  The to Boston with Love Exhibition will be on display at the Museum of Fine Arts from May 23 to June 16.

My Modern Quilt Guild is participating.  Bright colors were encouraged as well as messages of peace and love.

I chose some prints, did some wonky stripes and added a dove like Peace on top with some free motion quilting.


I stamped the back and it went fairly well for my first time stamping.  One upside down letter and running out of space...I think they'll still get it.  :)

To Boston With Love

Tuesday, May 7, 2013

Shirred Back Sundress Tutorial


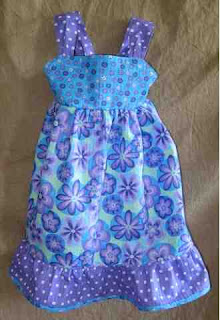
When shopping for the princess sundress material, we also spied a lovely turquoise and purple coordinating collection.  We picked out three prints and I searched around for pattern ideas. After finding many great tutorials out there, I decided to copy the bodice from a dress we have and then add shirring to the back. Giving it a full skirt was also part of the plan. 

I started tracing the dress bodice. After it was all done, I think I allotted too much for seam allowances and it would fit a bit better smaller across. I took pictures along the way and will share them as a basic tutorial. This is about a 3T. 

1/2 yard of each fabric would be plenty

Cut
2 front bodice pieces
1 back 3.5" wide by 16" long
2 straps 4.5" wide by 12" long
1 main skirt panel 14" long by 44" wide
1 bottom ruffle 4" by 60" 
1 strip for the bottom edge totaling 60" long by 1.5" wide 

Take back piece and hem top edges by folding in the raw edge twice and top stitching. 

Next with a hand wound bobbin of elastic thread and coordinating top thread using a long stitch length, sew rows of stitching close together the whole width of the back piece. Steaming the elastic afterwards brings the shirring together further. Sew down each short edge securing the elastic thread. 

Prepare the straps.  Fold each strap over right sides together, sew the long edge in a 1/4" seam allowance. Turn and top stitch. Because the straps are wider, I decided to add a little pleat in the strap before sewing it into the bodice. 

Position each strap at the top edge of one bodice, right sides together.  Then add the other bodice sandwiching the straps in. Sew across top edges catching the straps. Leave sides open.

Turn and press.  
Open side seams and press under 1/4" on the front bodice side seams.

Attach the back to the bodice front slipping the back between the turned under side seams. 

Take strip and fold in half, then fold long edges into fold, press.  
Prepare bottom ruffle, sew together to make up about 60".  Finish edge with serger or zig zag.

Sew strip onto bottom edge so the raw edge is enclosed. 

Gather top edge of bottom ruffle.
Prepare the skirt.  Sew ends together, right sides together. Finish edge with serger or zig zag.  Add ruffle to bottom edge of skirt. Finish edge with serger or zig zag.
Gather top edge of skirt and attach to bodice. Stretch out shirring while sewing the gathered skirt. Finish edge with serger or zig zag. 

Check size of straps and positioning, adjust and sew to back. I zigzagged the strap edge after attaching it. Final step is to top stitch on bodice front. 
Sundress front
Sundress Back with shirring


Sunday, May 5, 2013

Something to do

My Modern Quilt Guild is participating in making blocks for the Quilts for Boston project. The colors to include are yellow, blue, grey and white. When looking for colors in my stash, I was happy to find the white on white shamrocks I used for my St. Patrick's Day wall hanging. The grey is from my son's bed quilt. I like that that we will be connected with a quilt recipient.

Quilts for Boston

Wednesday, May 1, 2013

Long Princess Sundress

My new three year old has been looking for long dresses to wear and most of hers are too short. I remembered that it's often at this time of year that JoAnn's carries shirred top fabric for simple sundresses. I went to their website and not only do have many choices, some of them have princesses, Minnie Mouse, or Hello Kitty on them.

We went to Joann's and found many great options! She chose the blue with Ariel, but it wasn't quite as long as she hoped. We found a great sparkly purple to match the purple flowers. The plan was to make a ruffle at the bottom and also use it for matching straps.

It all seemed to go together well, though took a bit longer than I anticipated. Sewing with a mini helper sometimes goes that way.

This fabric panel was serged on the top and bottom edges. The bottom doesn't show because it is in the ruffle seam. The ruffle was cut at 3.5" and hemmed at the bottom. At the last minute, I decided to turn under and top stitch the top edge, but it would have been be fine as it was. The straps were also 3.5" wide, folded in half and stitched right sides together and then turned. Then I made a casing on one side for 1/4" elastic to form a kind of ruffle to compliment the bottom.

My daughter helped by trying on the dress many times for the right back seam and also for strap placement. I used safety pins for the straps as to not poke her.