Sunday, April 29, 2012

Marble Runs

When I was a girl, I loved playing with a wooden marble run that I always remember having. It actually still resides at my parents' house and I continue to enjoy it along with my children.

Over the years, we have purchased or received a variety of marble runs as gifts. We had a build your own plastic one, an expensive interchangeable wooden one, and a couple toddler versions that used balls.

While the concept of a changeable marble run is nice, it always seemed to get knocked down or fall down before we were done playing with it.

The wooden ones are the most appealing to me and they seem to be the most expensive.

This Christmas I hoped we could get one like my parents', but maybe with the improvement of double racing rails. I found a couple varieties, mostly Amish. Again, cost determined that I should wait a little longer.

My husband wondered if he could build one for us, but time got away again.

In the mean time, I thought I could find some molding that might work for us. I wondered too of it could later be incorporated into a constructed marble run.

I took two marbles and my two girls to Lowes. We checked out the molding options and found one that allowed the marbles to run nicely.

After returning home with my 96" piece of molding, we talked about options for cutting it. We decided on thirds, one for each kid.
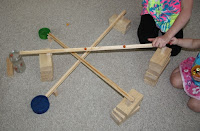
blocks, marblesThe bottom of the molding is a little too rounded and tippy for setting on a flat surface. But looking through our blocks, we found some little "U" shaped blocks that hold the molding very well.

My $7 molding has been a great purchase so far and provided hours of play in the two days we've had it.

Maybe for my birthday I can have a two rail wooden marble run...I'll make it my wish. :)

Mastectomy Pocket Pattern for Athletic Top

About five years ago I went through breast cancer treatment including a single mastectomy and reconstruction.

Perhaps the reconstruction was always a little uneven, but time and transformations due to pregnancy and breastfeeding have given me an unmatched set. It was when I was halfway through my post breast cancer pregnancy in 2010 that I really noticed a difference. I took a trip to Thelma's and the lovely ladies there found me an enhancement and a mastectomy bra which has pockets for such enhancements.

As I neared my due date, I realized that bra shopping might never be the same for me. And what exactly is the demand for a nursing, mastectomy bra? Probably just me and maybe a handful others.

I had a few old nursing bras that I was able to sew pockets in for my enhancement. Another trip to Thelma's yielded a stretchy bra that would work for both purposes too.

Hidden Mastectomy pocket inside
Now that I am teaching hooping exercise classes, I find myself wearing an athletic tank top. I started out just wearing my regular bra underneath. That worked pretty well, but I didn't always like my old, worn bra strap peeking out.

There were many times when I would think about what options might work. I considered a new bra, a mastectomy tank top, and adding a pocket myself. On the one hand I didn't want to ruin my tank top. Also, stretchy material is notoriously less friendly for sewing. But I did remember a hot pink four way stretch material I had from long ago that would work quite well.

Finally during a trip to Target, I noticed the athletic tanks were on sale and there were new colors. I decided on purple. I think the fact that I had two now made the decision to mess with one of them easier.

I found that hot pink stretchy material surprisingly easily. And my crude pattern from when I adapted the nursing bras was located as well.

I marked the center of the tank top and used rolled scotch tape to hold the pocket in place. My first attempt was with a wiggly toddler in my lap, but it worked and the stitching is not visible from the outside.

Attempt number two was slightly more aesthetically pleasing, but not too much. I'm delighted with my altered tank tops. They look great from the outside and allow me to leave my old bra home.

Adding a mastectomy pocket is much easier than my brain leads me to believe. Probably the best tips are to use a stretchy material, allow the "pocket" to be pretty generous following the contours of the bra or top, to leave two openings to allow easy access to the pocket for insertion and adjustments, and to remember that the stitching won't show and doesn't have to be perfect.  :)

Saturday, April 28, 2012

Homemade Soft Pretzels

These are super easy to make, require no rising time and you get to kneed dough! The recipe is from my mom and I'm pretty sure it's from the Motherhood and Applepie cookbook. Making pretzels seemed to be a common snow day activity along with baking cookies.

Begin with
1 packet of active dry yeast
1 1/2 cup warm water

Add
1 teaspoon salt
1 Tablespoon sugar

Gradually add 3-4 cups of flour (whole wheat or white or mixture of each)
Then kneed until smooth adding additional flour as needed.

Make pretzel shapes or letters or snakes. Similar thicknesses will bake more evenly.

Place pretzels on ungreased baking sheets.

Recipe calls for 1 beaten egg to be brushed on pretzels and then Kosher salt sprinkled on top. In the past I've used egg, egg whites only, and also just water.

Tonight we tried a different method. We used 1/2 cup of warm water mixed with 1 Tablespoon of baking soda and dipped the pretzels in the mixture quickly before going on the baking sheet. They instantly became more mushy due to the water. This step is another way to achieve the golden outside and it seemed to make them even softer on the inside.

After the dipping, we sprinkled with Kosher salt and baked normally.

Bake at 425 degrees for 12-15 minutes, cool on wire racks.

So delicious! Best eaten right out of the oven after a moment for cooling. Could easily be used for sandwiches too.


Monday, April 23, 2012

Webster Hoopers @ Community Arts Day

Because I have started a hula hooping fitness class business, I have been looking for ways to get the word out. Recently, I added my web address to the back window of my car.

The Community Arts Day was coming up and my daughter was performing in the talent show. I saw they were accepting exhibitors. I just needed to make up a poster and I also hoped to make a t-shirt with my logo.

I decided to use a trifold board and add images and text to it. It seemed quite tall, so my husband cut it down a bit for me.

I remembered seeing this hoop-like fabric advertised in a JoAnns ad a couple months ago. I hoped I could find it again and use it for a tablecloth. When I first saw it in the ad, I couldn't find a good reason to buy it.

I found the fabric and sewed under the four edges to make a card table sized tablecloth. The colors from the tablecloth then became my theme for the trifold board.

I had given a lot of thought about making a t-shirt. Actually when I needed a logo for my Webster Hoopers, I had already been working on one for a t-shirt. I hoped to do a silk screen or at least make a template and paint inside. But time was running out. I decided to wait and just used iron on letters. The letters worked very well and I heard a lot of people reading my shirt before actually seeing my trifold board.

I contacted Hoopnotica for promotional materials and received some postcards and also a promotional DVD that was perfect to have running at my table. I brought along our mini portable DVD player and used it until the batteries ran out.

The event itself was amazing. After setting up with my toddler in tow, it was time for the talent show. My eight year old daughter, Sydney performed with her unicycle and also hula hooping. She is a natural hooper! Once the show was over, I was back to my table hooping with kids and adults as they passed by. It was a full day of hooping and meeting many great people!

Tuesday, April 10, 2012

Webster Hoopers Window Cling

In February I became a Certified Hoopnotica Instructor and in March I started teaching classes. Little did I realize I was actually starting a business too. I needed a name, logo, website, Facebook page, and advertising.

I started with a website for my Webster Hoopers and created a logo from an image of myself hooping.

Flyers have been handed out and posters hung.

I often have a bunch of hula hoops visible in the back of my station wagon. I wondered if I could have my website address there. I considered purchasing a window cling, but wondered if I could make one.

I remembered I had alphabet stickers that were pretty big. They'd stick the wrong way though. Then I wondered if I could stick the stickers to clear packing tape and then stick the tape to the inside of my window.

I cut out the letters first to see how long it would be and to make sure I had all the right letters. Then I laid out the packing tape and used masking tape to to hold the packing tape in place.

Everything went together quickly. I brought it out to my car and stuck it on the inside of my rear window. Right away it was apparent that the black letters on clear tape was not bright enough. Probably if I had used white letters or a bright color, it might have been fine. But the dark letters faded into the dark interior.

Instead of starting over with letters I don't have, I tried to figure out what else I could do. I contemplated colored tape we have, but all of the backsides are whitish and not great looking. Then I came across some silver tape I had for hoops. It seemed like an acceptable option. I will have to see how long this DIY window cling turned sticker will last.

Tuesday, April 3, 2012

Felt Easter Cookies

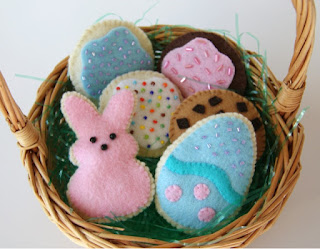
bunny, egg, chocolate chip, sprinkle felt cookiesA friend of mine really liked the felt cookies I made and asked if she could order some from me. I said sure!

Easter is right around the corner so I offered some Easter themed cookies in addition to the round ones I had made before.

I found the egg and bunny patterns at the Moody Fashionista blog.

I think the egg is my new favorite.
Kessa delighted with her new egg cookie