Thursday, October 31, 2013

Amelia Bedelia Costume

I haven't dressed up for Halloween in a while.  One of the parent volunteers suggested we all dress up for the school party.

There was a Fasching Party I dressed up for last February and spent some time considering costumes.  For that one I decided to go as a photographer/safari goer mainly because I could wear fairly normal clothes and take lots of pictures.

But when I looked at costume ideas, I looked for ones that were redheaded.  Amelia Bedelia was one of them.  This costume seemed to make the most sense for a school party though.

I headed over to Savers to get some second hand clothes.  Initially I planned to get a black dress, but I found an A line skirt I really liked and then got a knit black top and white blouse.  Sadly, I did not own any of those items.  I purchased white fabric to make an apron and used a black headband with black cardstock paper to make the hat.  I had a hard time finding flower daisies, but a very sweet senior couple helped me out and found yellow flowers that were close enough.  These flowers had long stamens, I simply removed them and hot glued a white felt circle instead.

The apron was not a quick make.  I had hoped it would be, but I had certain elements I wanted it to have.  I started with a gathered skirt and added a 4" ruffle at the bottom.  Then I created a waist band and made smaller ruffles to go next to the straps and upper part.  Every picture I found of Amelia Bedelia shows the back of her apron with the back crossed.  So I created long straps that would cross in the back and then I tucked them through a small belt loop sewn into the waist band and finally ending with a bow in back.

The mechanics of adding a ruffle, then turning or not turning the straps was difficult to figure out.  I ended up doing a lot of turning under a 1/2" and pressing, then sewing wrong sides together.  That seemed to be the easiest.  The whole project probably would have taken less time with a proper pattern and instructions.  But it was completed well before bedtime and that was my goal.

Wednesday, October 30, 2013

Halloween Taboo Game

As Halloween approached, I was on the lookout for some activities for my daughter's fourth grade Halloween party. There are some great ideas out there. One was a talking game where certain halloween words had to be avoided. Another site simply suggested a Halloween taboo game. I've always enjoyed the game Taboo. I think it's great to make yourself think in different ways. 

Searching specifically for a Halloween Taboo game didn't yield the results I had hoped. Finally I decided to create my own game. I started with basic Halloween words and then borrowed some from Halloween word searches. Once I got started, the words came quickly to me. I only have three "taboo" words per card because I know it can be a tricky game for younger kids and even some adults!  At least knowing the topic should probably help too. I ended up with forty cards adding in some fall topics. I'll bring along a timer as well. 

I printed on orange card stock and then laminated the cards.  Hopefully the kids will enjoy the game as much as I anticipate liking it.

I have PDFs of the cards and can send them out via email, just let me know. 


Saturday, October 26, 2013

Fleece Hats

Nothing like a chilly night and morning to inspire a warm hat.  As we are headed out this afternoon for trick or treating in the village, I thought a warm hat might be nice.  Then I wondered why I never had a Halloween themed hat.  It's always chilly around Halloween.  I already had my orange fleece out from the Fox Hoodie.  Beginning with a fleece hat of my daughter's, I copied one of the four panels.  Then I cut out jack o'lantern face shapes from black felt.  After sewing two panels together, I zigzagged the shapes on.  Then I found some brown fleece and made a stem.  I sewed the rest of the hat together and added a 4" folded cuff.

My husband wanted a hat too.  I found some really nice grey microfleece and made the panels a bit smaller so they would fit better. I tested it on his head and figured out the head band using 5" this time.

We will both have warm heads on a chilly day!

Friday, October 25, 2013

Sock Monkey Costume

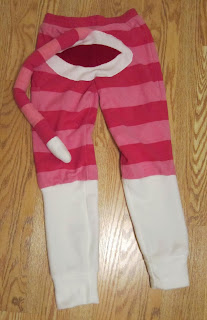
My older daughter wanted to be a sock monkey. I checked out the commercially made costumes and also what others had done as DIY. I didn't really like the commercial ones and thought she might like something with more color. Her sock monkey toy is light and dark purple stripe. I searched for a hat to start and found a pink stripe sock monkey hat. From there I sought out pink striped pajamas. Finally I found pajama separates that would work.

After they arrived, we headed to JoAnns and found almost exactly matching micro fleece pink and dark pink for the tail. I made stripes and ended with a white fleece tip. More white fleece was for the mitts and leg bottoms.

Originally I planned to just make long mitts and leg warmers and preserve the pajamas.  But once the tail and bottom were on, it seemed like it would be best to just alter the pjs further.  Also, the pants were a hair too short for my daughter, so adding the white was helpful.  At the very bottom, I added a fleece cuff.

 For the monkey butt, I used more white fleece with some red fleece zigzagged on.

If I had planned to cut the sleeves and legs initially, I might have been able to salvage them for the monkey tail.  Though I am pretty proud of my matching fabric and same width stripes.

As I was finishing the costume, I really needed my daughter to try on the top and pants in order for me to add the white parts.  She was at school so I decided to make her a sock monkey bag.  I had seen a nice trick or treat bag here and used the basic idea.  It was fun to get the parts together.  My dimensions ended up being about 8.25" by 29.25" with a 10" circle on the bottom.  I think because I used fleece, it was rather floppy.  I went back and added 3/4" elastic in the top.  The elastic gave the front a bit more body and the gathered back will hopefully hold the candy in better.


Bonnets


colonial, praire, sunhat
prairie, sunhat sun bonnet, colonialA friend asked me if I had a bonnet she could use for a Halloween costume. I didn't, but I tried to offer some easy bonnet ideas and suggested there are probably many tutorials out there, possibly even out of paper.

After I sent off my suggestions, I couldn't help checking out some tutorials. I found one that seemed easy and quick. My daughter would need a bonnet this year also for their Colonial Days.  I offered to help my friend out.

Adult vs child bonnet
The tutorial seemed to be for a child's sized bonnet. I looked around for adult sized bonnet dimensions and wasn't finding exactly what I wanted. I decided to just made the bonnet as the tutorial stated and then know better what to change for a second one. 

The child sized bonnet fit me ok, but when my daughter tried it on, I liked the way it fit her better. I decided to add 1" to the brim front, 1" to each brim side and 2" to the crown square.

Child sized bonnet - age 9
The tutorial used a 14" x 14" crown piece and a 3.5" x 18" brim piece.  For the adult bonnet, I used a 16" x 16" crown and a 4.5" x 20" brim.  After trying on the bonnets again, I could go either way with the width of the brim (3.5" vs 4.5").  Especially with me adding the 2" (then folded to 1") ruffle, it does extend into the face more.

Each piece has a curve cut into one edge.  I did use craft interfacing on both sides of the brim pieces.

Some helpful tips for the tutorial I did were the following.  After sewing a ruffle from a folded 2" strip almost 2x the width of the brim, finish the ends before sewing into the brim.

In the tutorial, it states to tuck the gathered crown in between the two brim pieces and topstitch.  Doing this would leave raw edges on the brim.  The missing step is to fold under (and iron) 1/4" on the raw edges of the brim before tucking the gathered crown piece in between.  This allows topstitching to occur with no raw edges showing.

Another helpful step is to leave a small opening in the straight crown section.  The directions state to fold under 1/2" and top stitch.  This leaves unfinished edges inside the hat.  I left a small opening near each end (in about 1") to insert 1/4" elastic through and used the 1/2" seam as a casing.

I made bias tape out of a 1.5" strip by about 9".  I noticed afterwards that many people make wider ties.


Thursday, October 24, 2013

Fox Hoodie

fox hoodie, fox hatOne of the requested Halloween costumes was a fox.  Inspired no doubt by the currently popular music video.  I thought a fox hoodie would be fun and could be used as dress up.

First I added the fleece face with zigzag stitches and hand stitched the nose.  I had orange fleece for the ears and hand sewed those on as well.  The tail used more orange fleece and was filled with polyfil.  Finally I added white fleece on the chest.  I asked my daughter if it should be more round or with points, she chose the points.  Pretty cute.

Beansie Bunny Costume


The three year old had many ideas for Halloween this year. She does enjoy dressing up and has a nice selection of dress up clothes and past Halloween costumes. I thought I would be sharing about a Lalaloopsy Halloween costume, but that was changed to ghost, lion, tiger, fox, and finally Beansie. Hopefully we can make it one more week without another change. 


Beansie was my husband's favorite toy as a child and has been waiting in a drawer for another child to love it. I was always cautious with old Beansie and let the other kids see it and then we would put him away. But things are always a little different with child number three. Kessa adores Beansie and even slept with him a few times. When she suggested a Beansie Halloween costume, I thought that would be fun and certainly nice and warm for our fall weather. Finding light yellow footed pajamas just made it even easier to make her wish a reality. 

Once the pajamas arrived from FootedPajamas.com, I took them along to the fabric store for ear material.  Adding bunny ears should be an easy task. I got pale yellow fleece and white fuzzy material. After washing, I cut out two bunny ears and added batting for some shape.
Floppy Ears

For the hood I added elastic in the front seam and two darts from front towards the back extending about four inches. Then I cut two slits for the ears and inserted the ears and stitched them in.  I thought I might be done and had my daughter try it on. The ears didn't stay up at all and apparently, that is a big part of Beansie's persona. 


While considering my ear options, I decided to remove the feet.  Initially I figured I could just remove the stitching and then eventually sew the feet back on. The bottoms were adhered to the fleece somehow and wouldn't come off. Knowing the pjs were too big for Kessa, I decided to cut off the feet above the elastic. That worked well for the first leg, but the second leg had the zipper extending through the elastic. 
Fleece Leg Cuff

It was at this time I realized I would be making more serious alterations. I removed the stitches in the zipper all the way until the crotch, shortened the zipper, and resewed the leg seam. I also took up the crotch seam a bit. Finally I made cuffs out of the extra fleece and sewed those to the bottoms.

Not only did my bunny ears not stand up, they were the wrong shape. I remade the ears and played around with interfacing and finally wire. I ended up inserting coated wire and wrapping the wire ends around a wide headband.  The ears then pushed through the holes on the hood.  This seemed to work. To keep the wire from bothering my daughter's head, I wrapped the headband and wire with strips of thin batting.  
Wire covered with batting


Headband inside fleece channel in hood
To keep the headband in place, I sewed a fleece channel in the hood.  The last step was to hand stitch the hood to the ears which were already in place by that time. 

It is a rather cute bunny costume and per the original Beansie, it has a black belly button and no tail. 


Monday, October 21, 2013

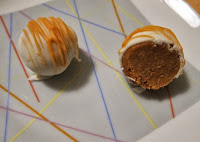
Apple Spice Cake Balls & Pumpkin Spice Round 2

My parents coordinate an apple pie making day at their church. The goal is to make at least 150 apple pies for their church's Election Day bake sale.  There are always a few goodies on hand for the workers and I thought some extra might be nice.


Apple Spice balls seemed like the logical choice.  Using the spice mix I use for the pumpkin spice cake balls and adding apples seemed to make sense.  I also added 1 cup of cider, a 6oz container of plain Greek yogurt and one egg white. I ended up using one and a half Granny Smith apples, finely chopped. After chopping the apples, I wished I had grated them instead. I did microwave the chopped apples in the cider for a couple minutes to soften them before baking. When mixing, I added the cider and other ingredients to the spice mix, then added the chopped apples at the end.

When I was rolling the cake balls, it was clear that some of the apples wouldn't be making it into the balls. So I just left some out. But grated apples would have allowed the apples to be more evenly present. I decided to try adding even less Neufchatel cheese (low fat cream cheese) and only used 1/3 of the 8oz block. I think especially for the apple and pumpkin which are moister, less is best.

I made up a batch of the pumpkin spice cake again (Spice Cake Mix, one 15oz can of pumpkin, and two eggs whites) and added only 1/3 of the 8oz block of low fat cream cheese. I think the pumpkin spice balls have been perfected.


After using a plastic fork for my other cake balls, I finally decided to try what some others had recommended which is to remove the center two tines of a plastic fork.  This allows more of the coating to drip off the bottom and it helps stabilize the balls a bit too.

It was very interesting to have two kinds of cake balls to test together. Even though both were made from the same spice cake mix, the flavors were somewhat different. To me, the pumpkin just melded together perfectly with pumpkin and spices both present, while the apple had an overwhelming spice flavor with a hint of apple.


with cream cheese Neufchatel cheese
Neufchatel cheese cream cheese
After about four hours of pie making, the almost 100 cake balls had disappeared!  They went over well and I did get some rave reviews. 


Monday, October 14, 2013

Revisiting Chocolate Cake Balls

As the last batch of cake balls is gone, I thought I'd try another batch.  I wondered if I could use less Neufchatel cheese (low fat cream cheese). In my first attempts, I had intended to add some and add more as necessary, but ended up just putting the whole 8oz package in. This time I added two-thirds of the 8oz package and mixed it into the cake crumbs. Once it was well mixed, it seemed that two-thirds was plenty. The balls held their shape fine.

Another thing I wanted to play around with was different shapes. I have a silicone heart mold tray. Each heart was probably double the size I wanted. I was able to just make a small ball and press it in the heart mold and remove. It worked ok. Some of the time the hearts got smooshed a bit coming out of the mold and needed reshaping. I also made some flat disks and some cubes. I figured the disks would be easy to decorate with sprinkles.  Balls are certainly the easiest and fastest to make.  Even my three and a half year old helped with decorating this time, including drizzling the melted chocolate on the tops.


Friday, October 11, 2013

Chocolate Boobie Truffles

After making pumpkin spice cake ball truffles in the shape of boobies, I wanted to try chocolate too. I blogged about my chocolate cake ball making process here.  Instead of rolling perfect balls, I flatted the bottoms a touch and made them more dome like. 

After dipping them in milk chocolate candy coating and cooling, I heated dark chocolate candy coating and used my a decorator bag.  Before cutting a small hole and decorating, I allowed the chocolate to cool a bit so it wasn't too runny. I squeezed out a bit of chocolate in a circle shape. The contrast between the two chocolates wasn't as much as I hoped. If I made these again, I would probably add a bunch of white chocolate to the milk chocolate to lighten it. I had purchased daisy shaped candy sprinkles and used the pink ones as nipple decorations. I think making my own sprinkles out of fondant would be better as well. I could do more with colors and shapes. 


Chocolate Cake Ball Truffles

healthier greek yogurt truffleAfter making the Pumpkin Spice Truffles, I knew more cake balls would be in my future. I especially wanted to try another kind because one of my kids isn't a fan of pumpkin. Chocolate was an easy choice. I hoped that I could make a healthier version of cake and use low fat cream cheese instead of frosting again. It was a great success and my nine year old daughter enjoyed helping out too.


First the cake: I used a super moist Devil's Food Cake mix and instead of the recommended additions, I added a 6oz container of plain Greek Yogurt, one egg white, and a cooled cup of decaf coffee. It baked 30 minutes in a 9x13" glass dish sprayed with Pam. 

After baking, I made some cuts and allowed it to cool. 

The next step was to crumble the cake up (removing the more baked edges) and combine with low fat cream cheese (Neufchatel Cheese).  Many people recommend combining using clean hands. I removed my rings and used my hands too. It is pretty easy to work the cream cheese into the crumbled cake.  The combination becomes a dough.

In trying this again, I used only 2/3's of the 8 oz package of Neufchatel Cheese and it seemed better.*

We then rolled the dough into balls and then chilled the balls in the freezer for about 20 minutes. With our 1.5" balls, we got 45 balls. 


The milk chocolate flavored melts melted very nicely in my Chocolate Pro melting pot and dipping went well. I used a fork along with a fondue fork.  A few did crack due to the temperature difference of the warm chocolate and the cold balls.  For the second sheet, we just left them out a bit longer and didn't have cracking issue


For decoration, I used dark chocolate and drizzled back and forth with a fork. 


Here is the nutritional information for one cake ball and 3 candy wafers which I estimate for each ball.


A lower fat and calorie coating might be a nicer option or using real chocolate.  Here is the nutritional label for one cake ball with the candy wafer coating.
*Using less Neufchatel Cheese reduces each cake ball to 89 calories and 3.4 grams of total fat.